
Okta Authentication
Users configured in the Okta app can be used to access the DW application.
In order to Import users from Okta, these two Okta applications need to be created:
2Ring DW - Auth
2Ring DW - User Import
2Ring DW - Auth
Create Okta application
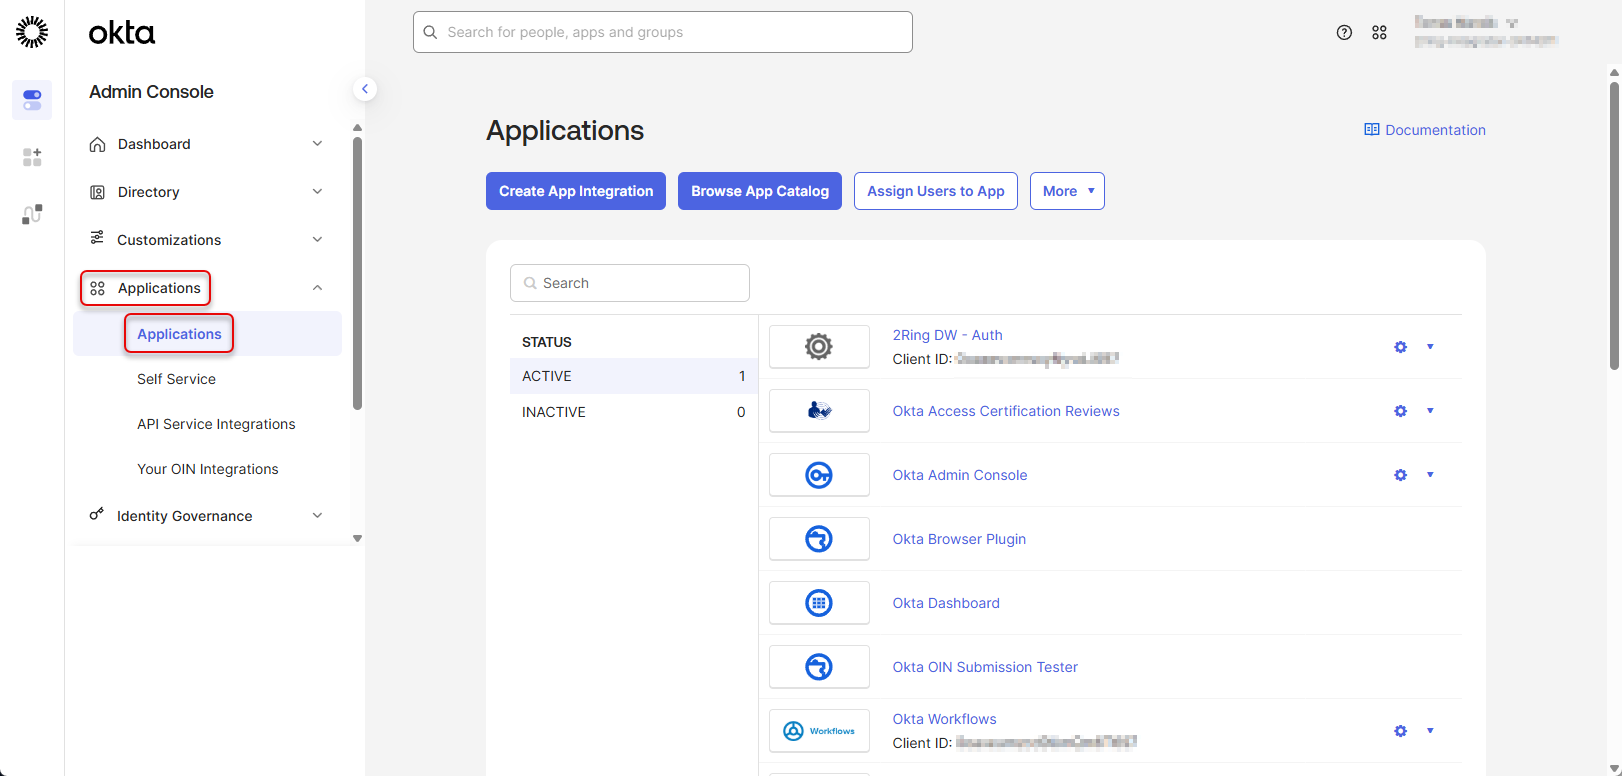
Login to your Okta account -> Applications -> Applications
Figure 1: Create Okta application
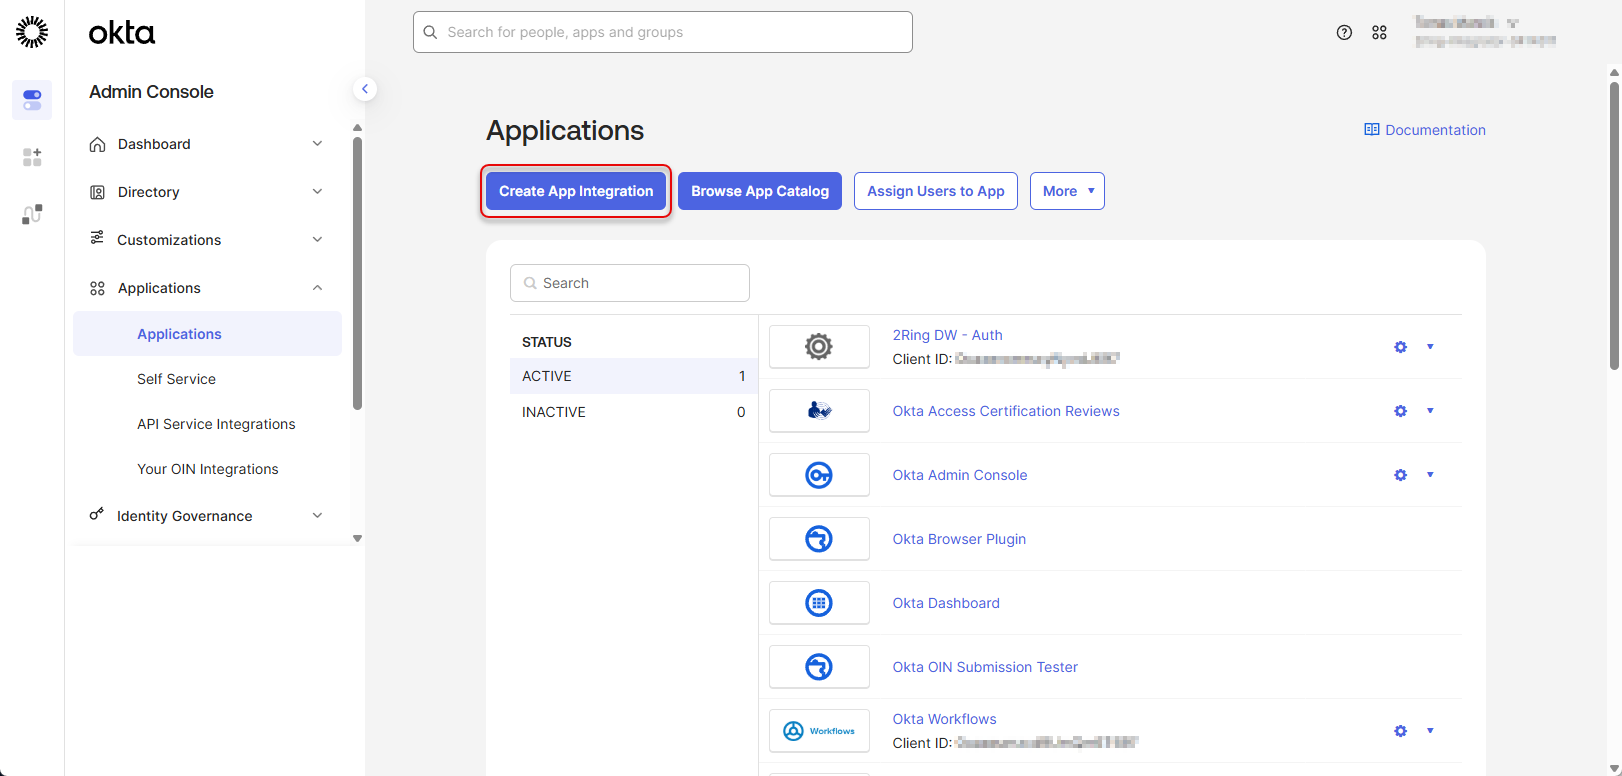
Click on “Create App Integration”
Figure 2: Create Okta application 2
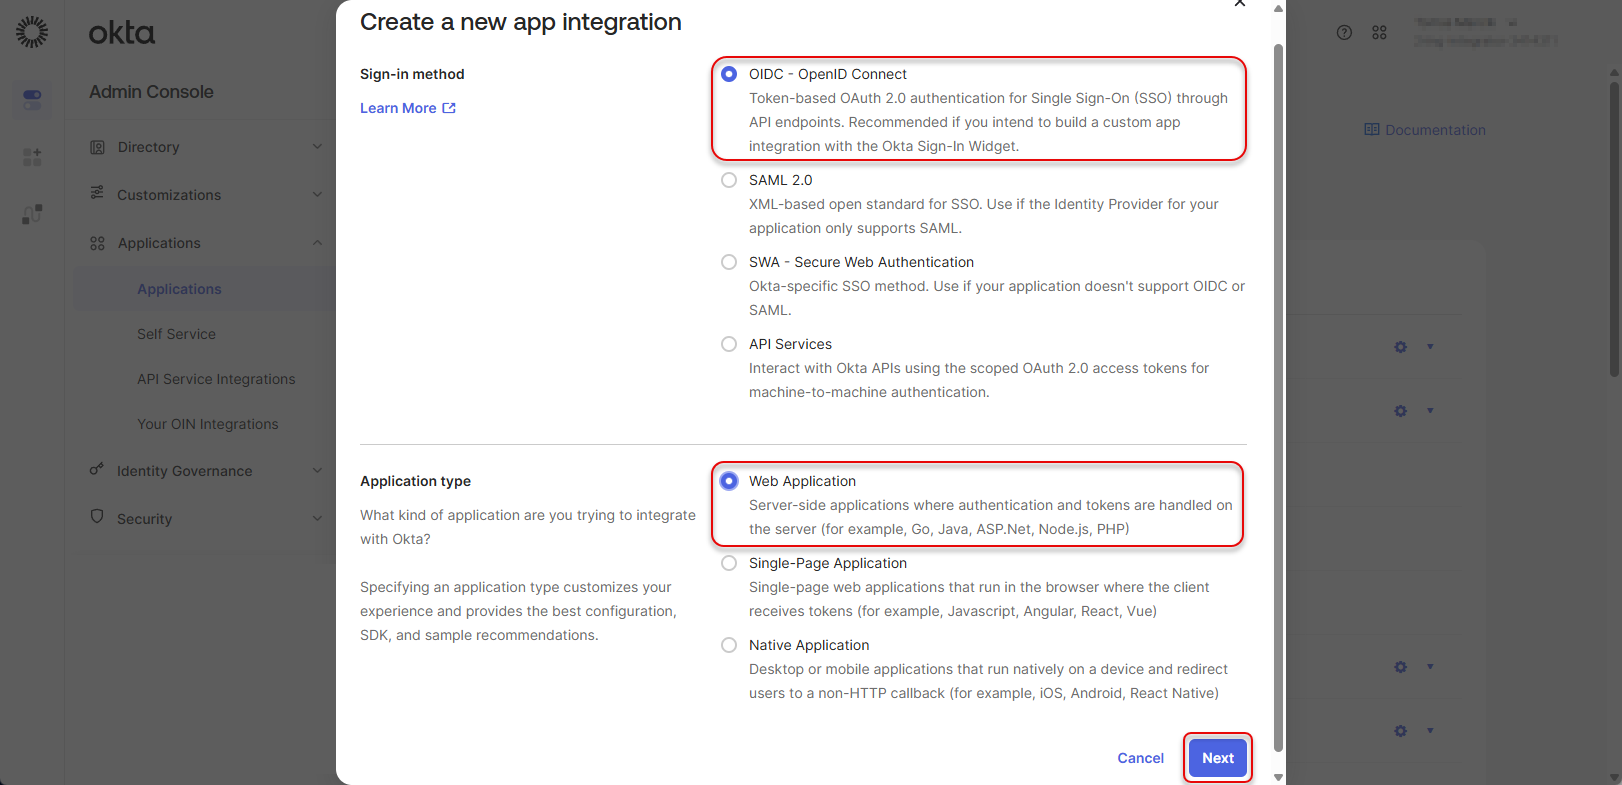
Select OIDC - OpenID Connect -> Web Application and click “Next”
Figure 3: Create Okta application 3
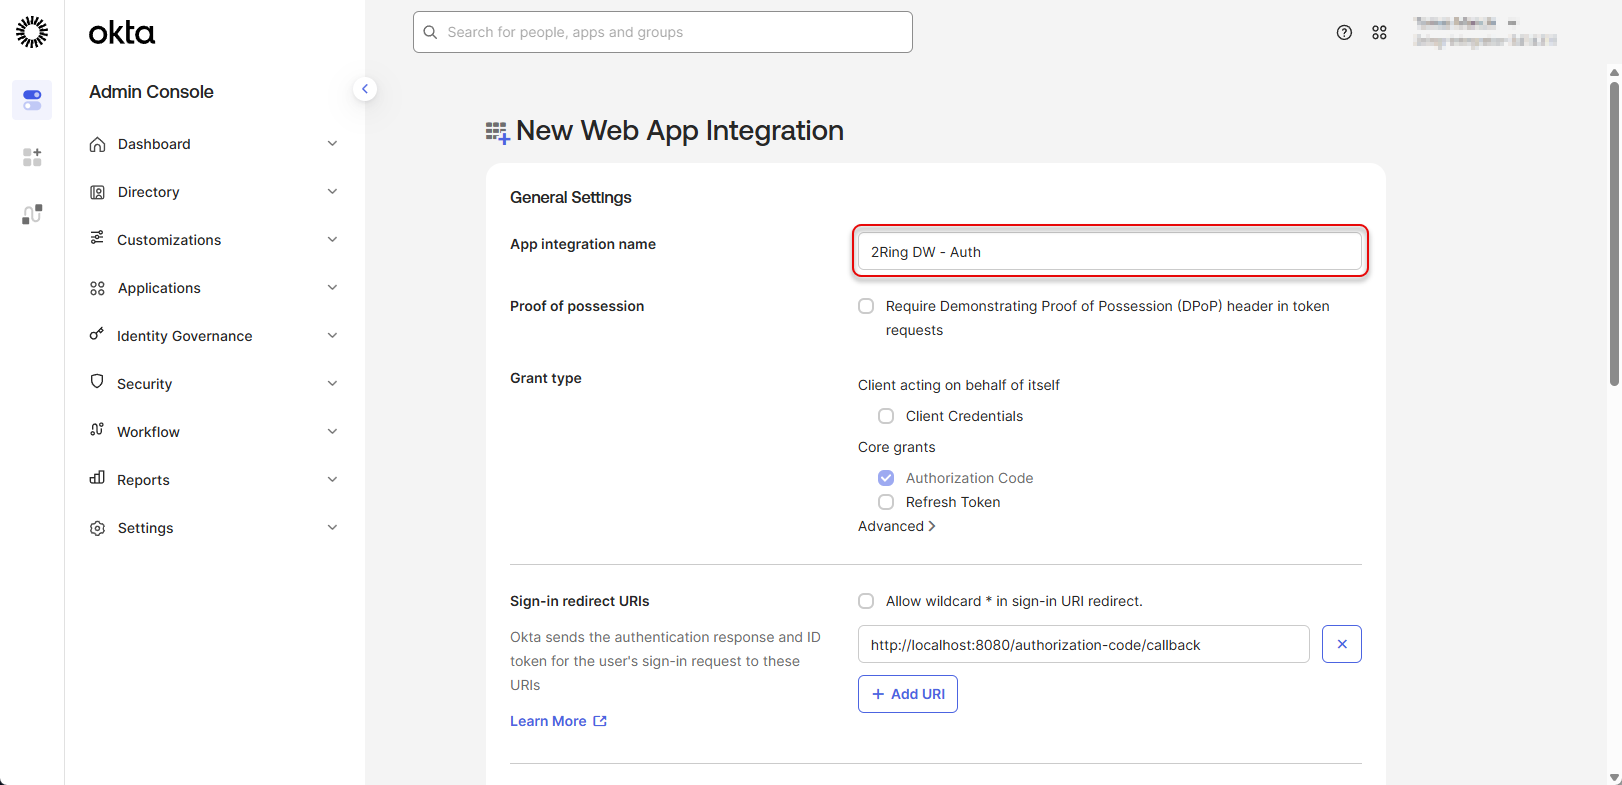
Fill the App integration name.
Figure 4: Create Okta application 4
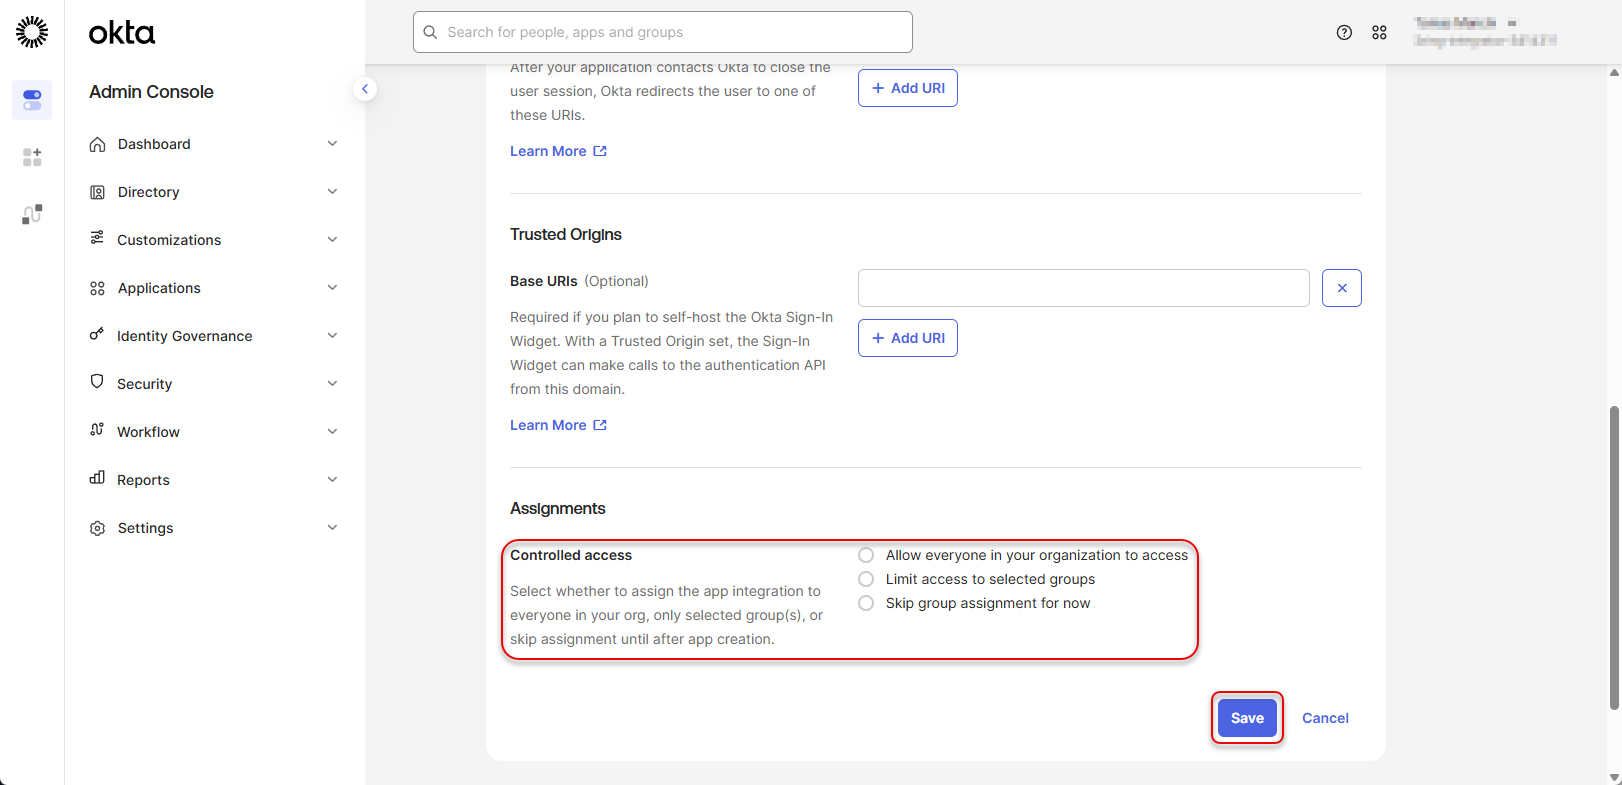
Scroll down to “Controlled access” section and define, who should have access to the app integration. Click “Save”
Figure 5: Create Okta application 5
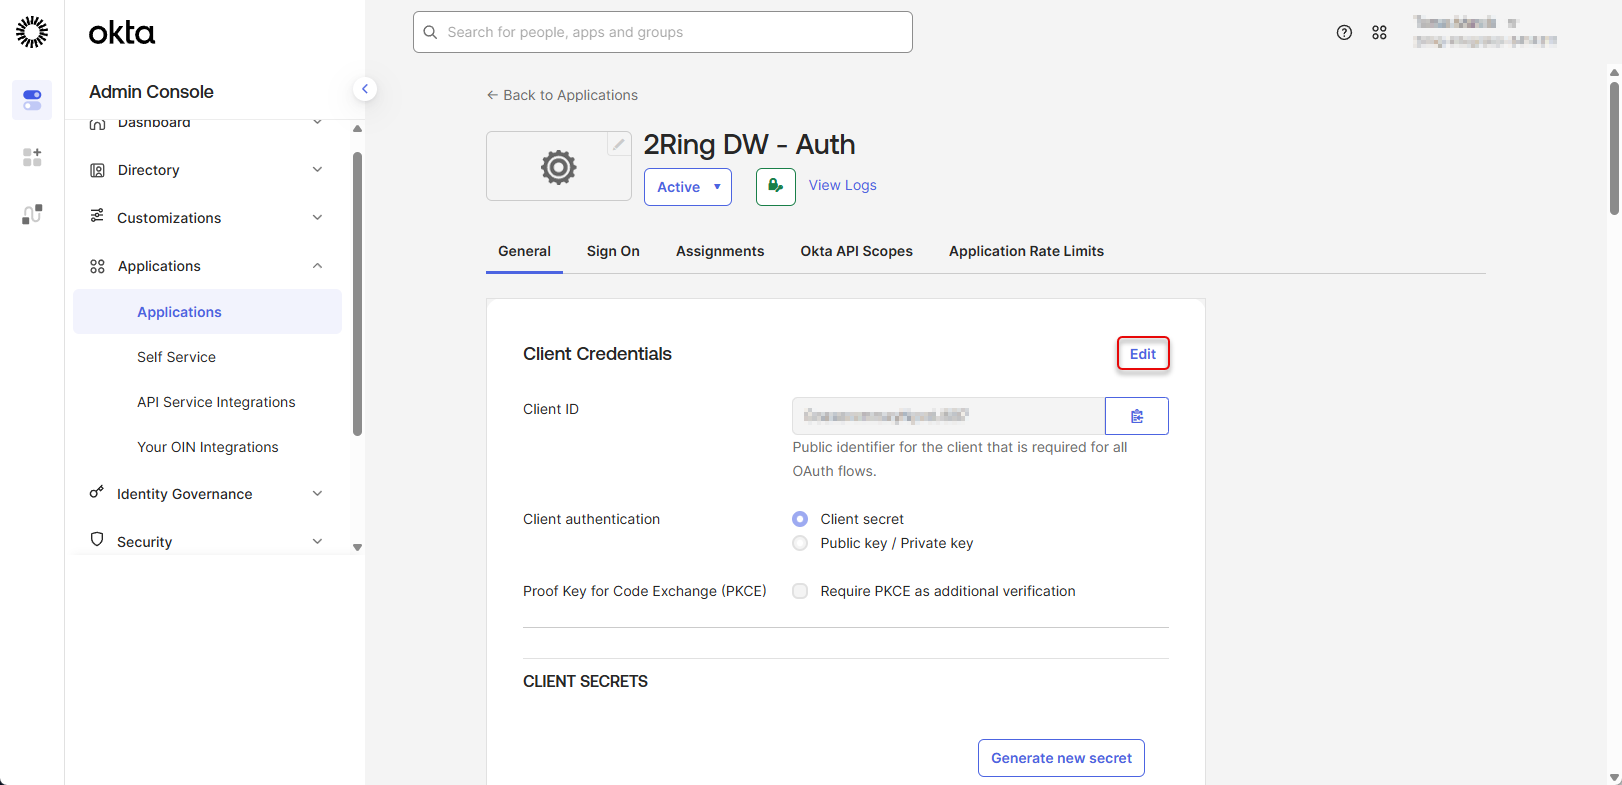
Configure Okta application
Go to Okta application page and click “Edit” in the “Client Credentials” section
Figure 6: Configure Okta application
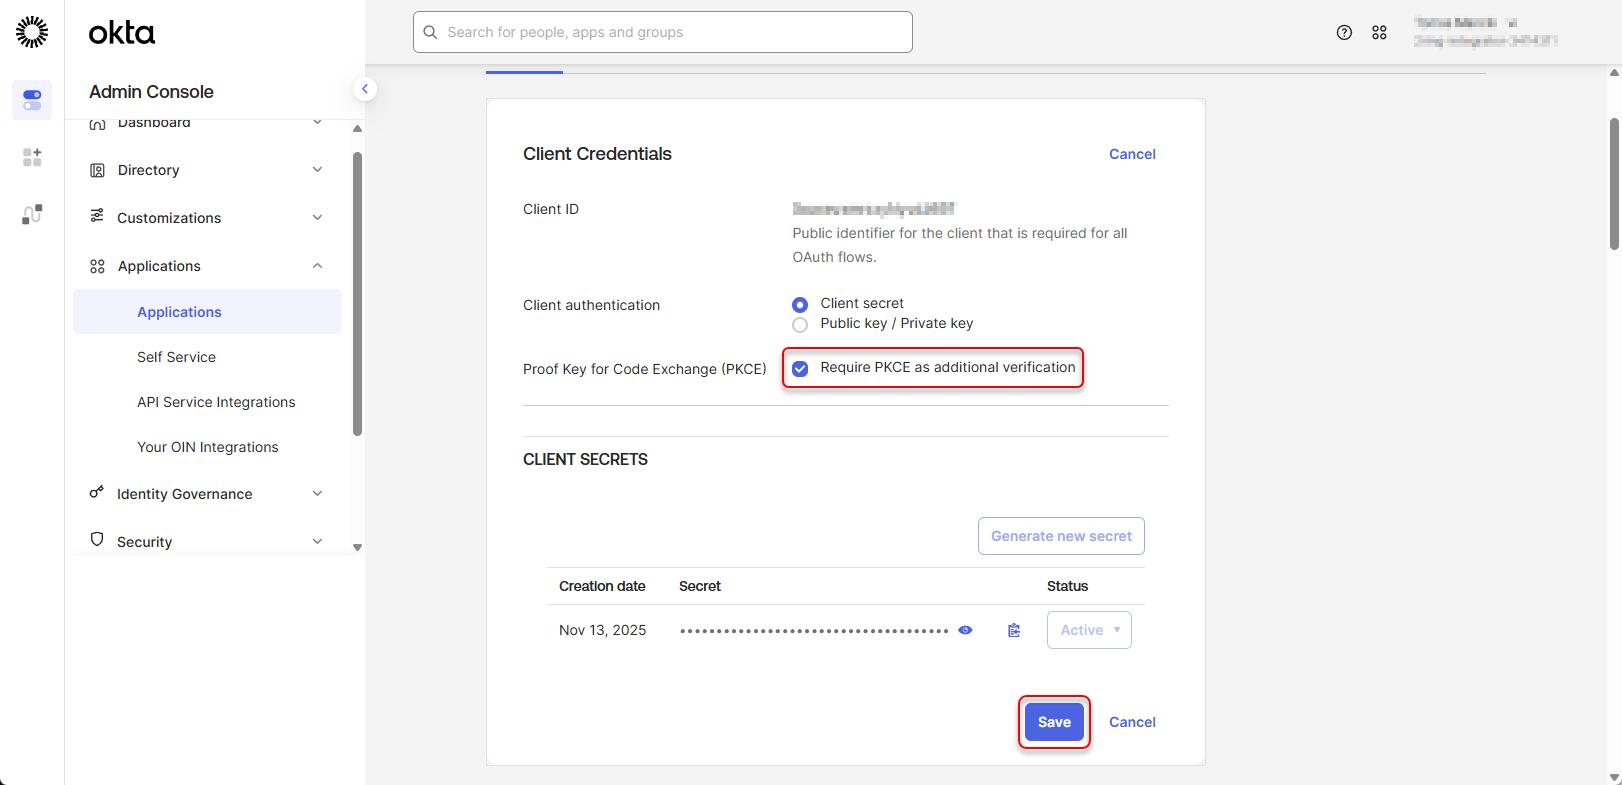
Copy the generated Client ID and Client Secret, you will need to provide them to 2Ring support later in the configuration process. Check the “Require PKCE as additional verification” option and click “Save”
Figure 7: Configure Okta application 2
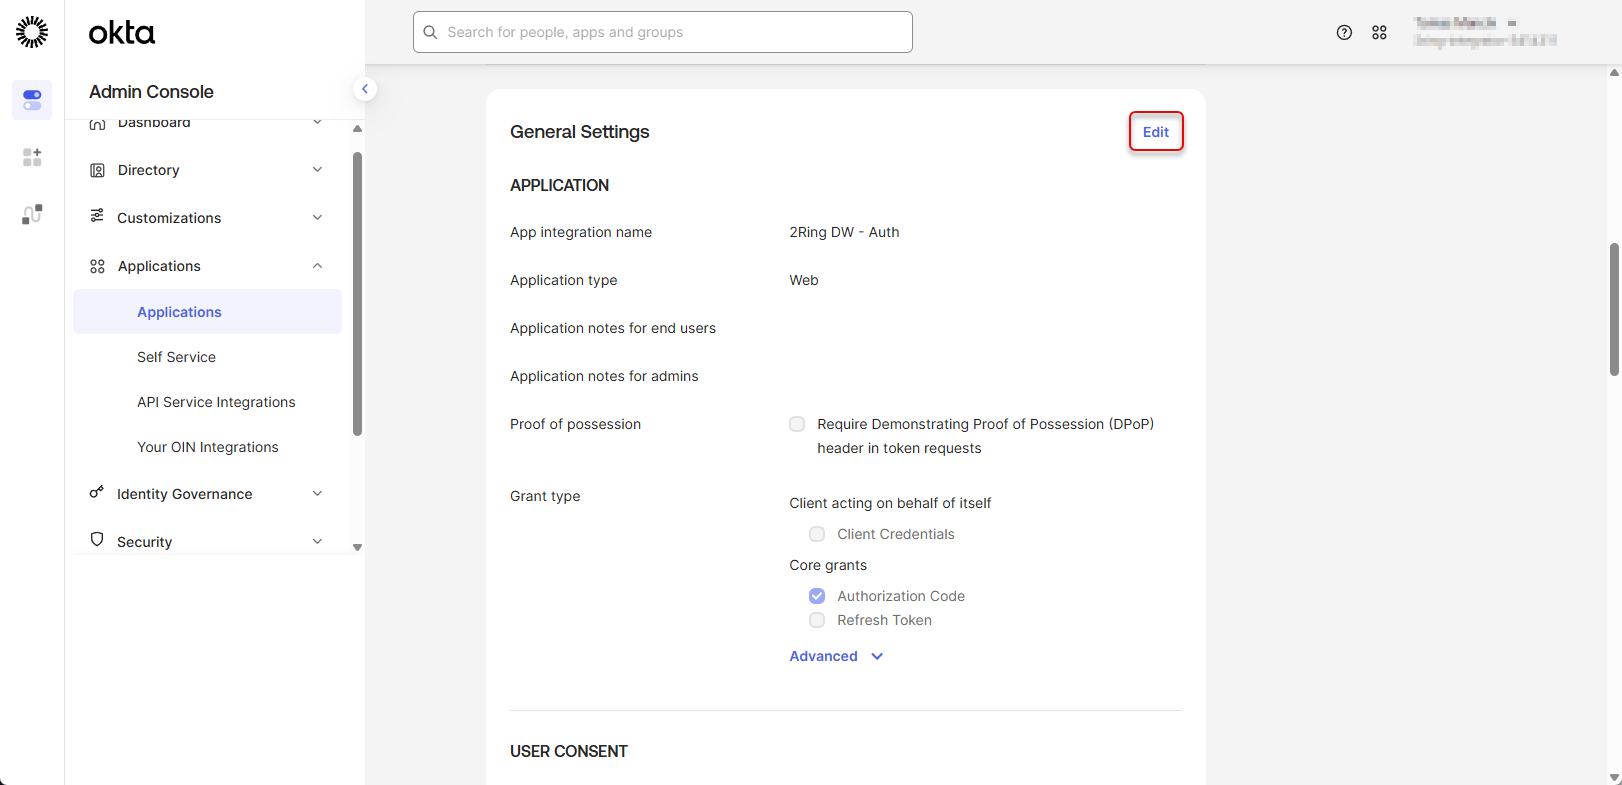
Click “Edit” in the “General Settings” section
Figure 8: Configure Okta application 3
Scroll down to the “Login” section and remove default “Sign-in and Sign-out redirect URI”
Figure 9: Configure Okta application 4
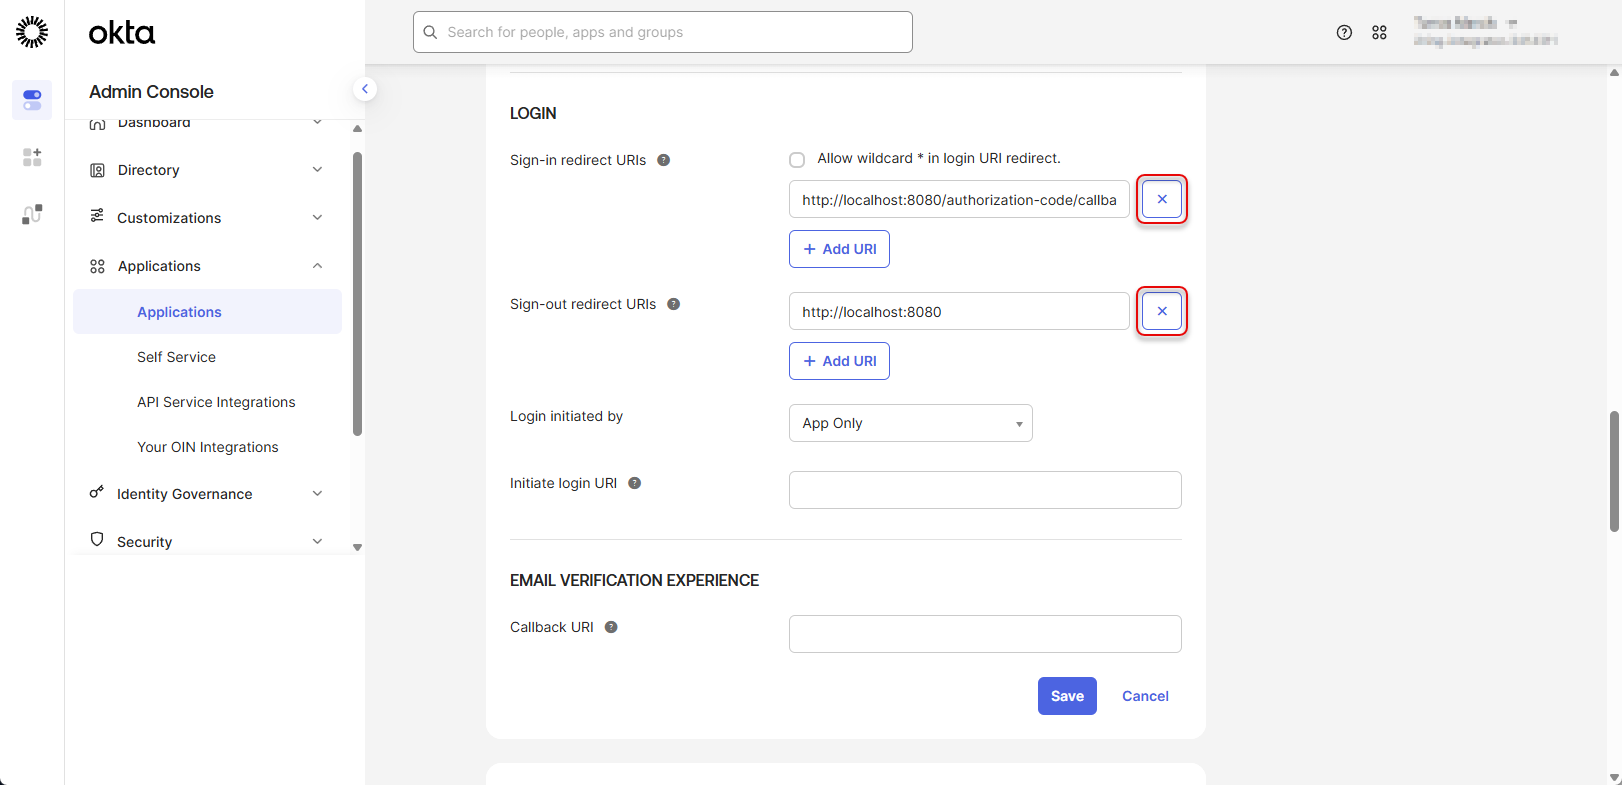
Contact 2Ring support to obtain the “Sign-in redirect URI” and add it to the application:
Figure 10: Configure Okta application 5
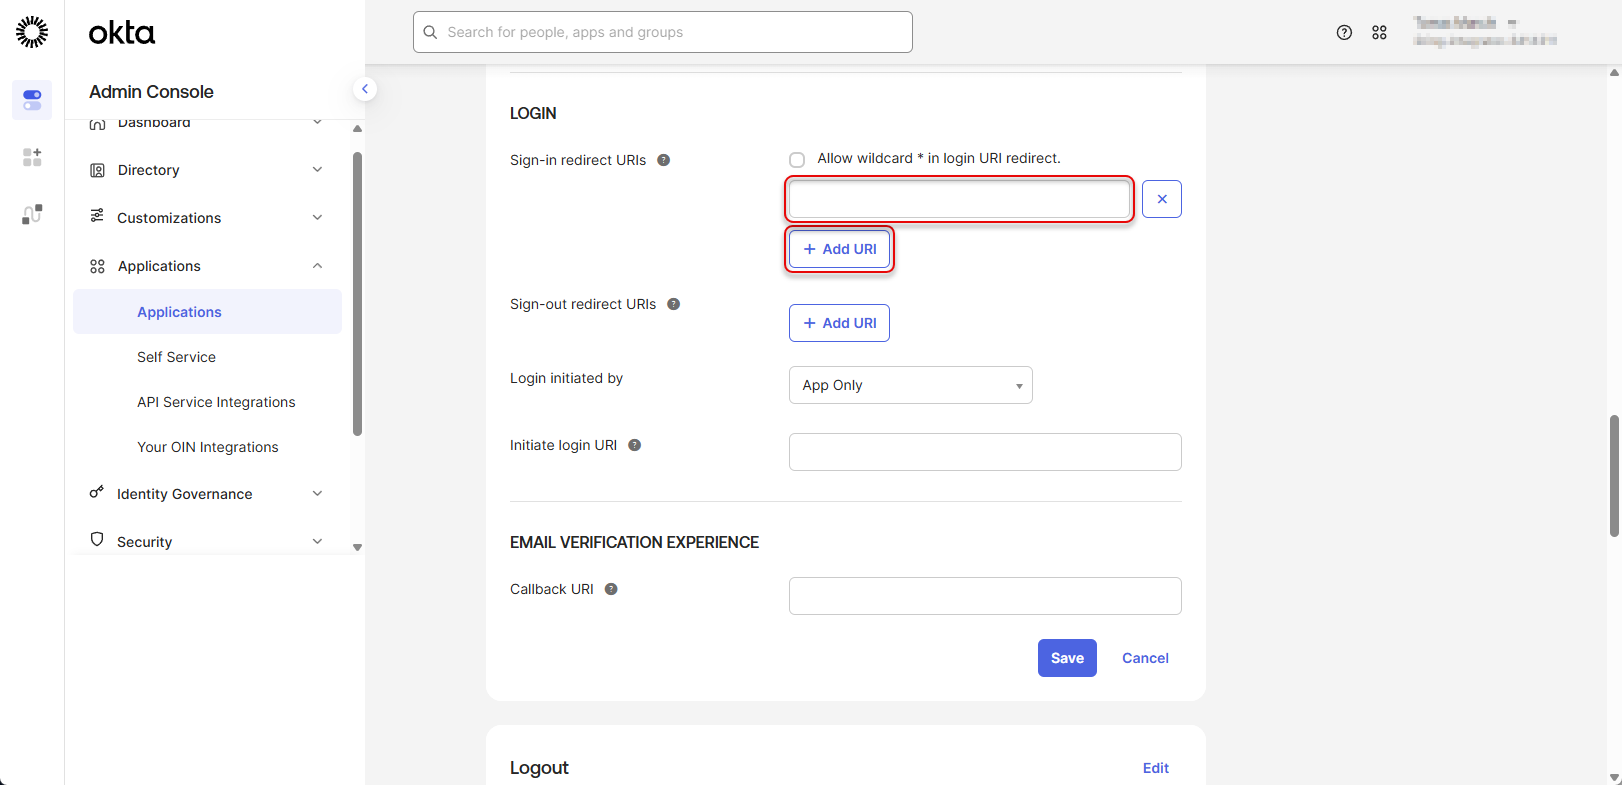
Contact 2Ring support to obtain the “Sign-out redirect URI” and add it to the application:
Figure 11: Configure Okta application 6
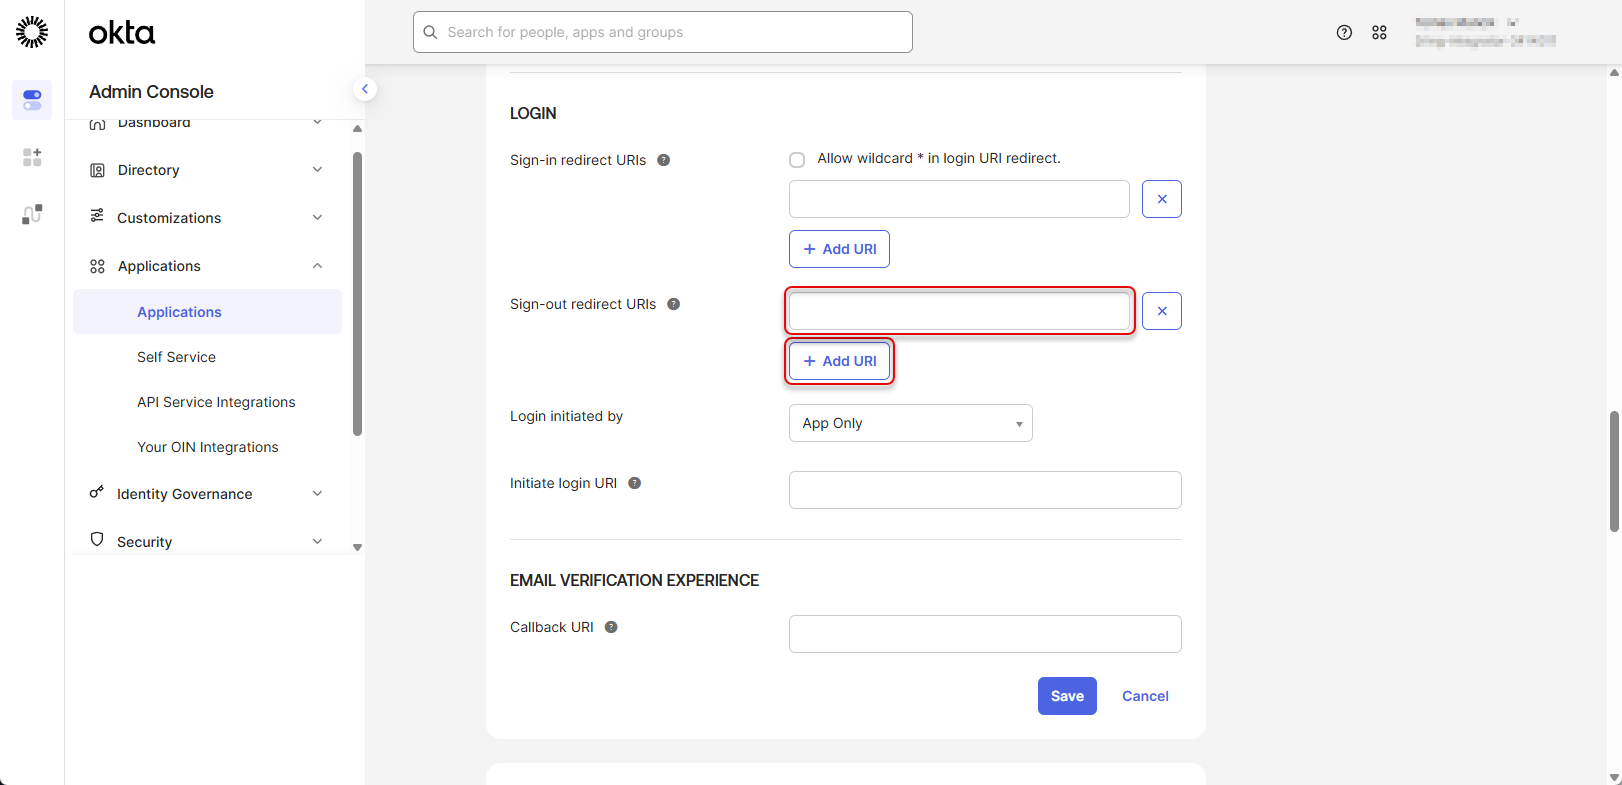
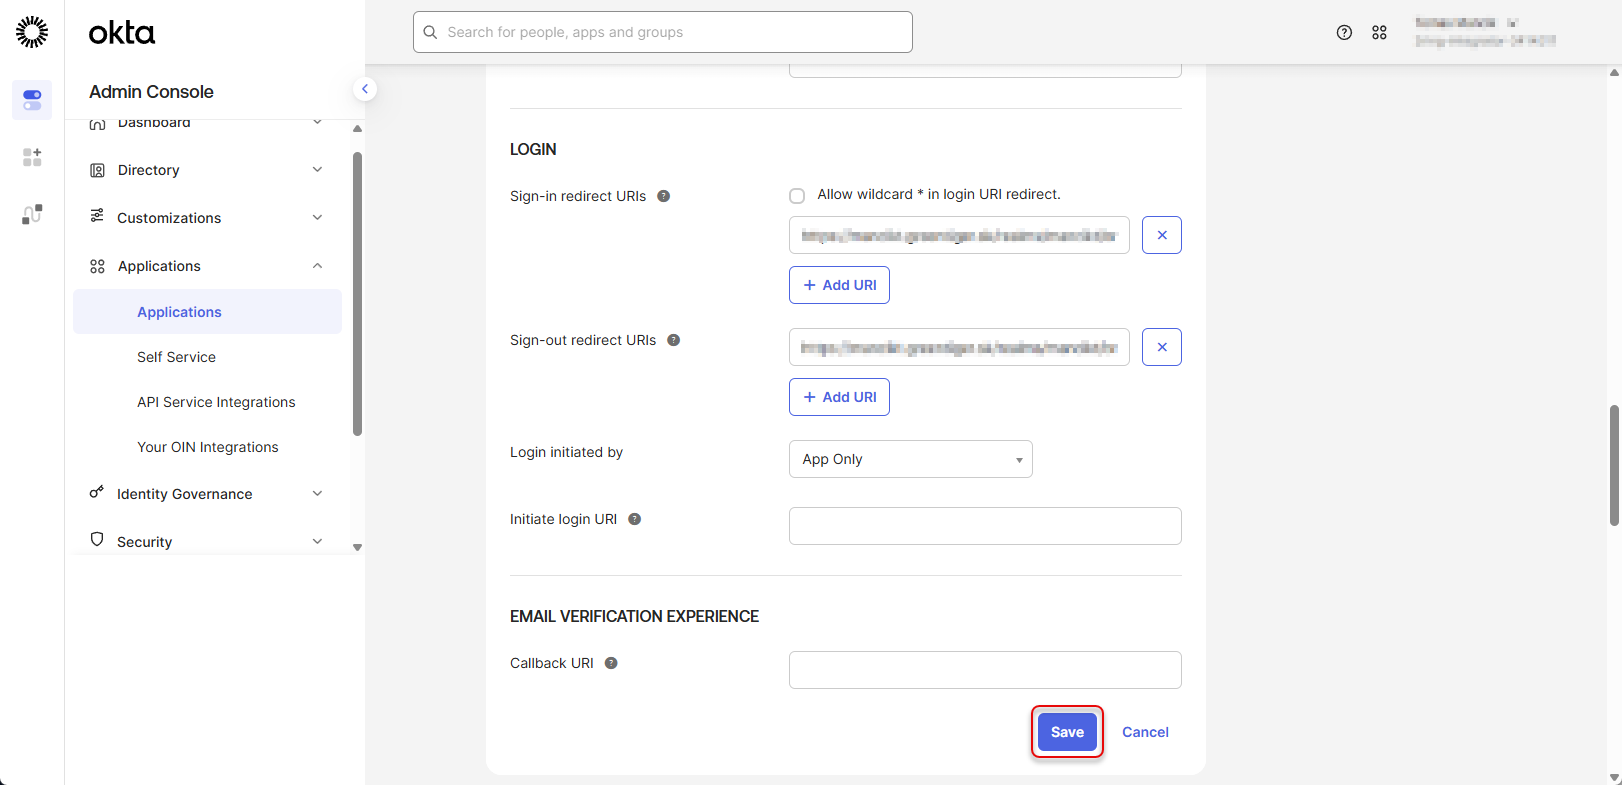
Click “Save”
Figure 12: Configure Okta application 7
2Ring DW - User Import
Create Okta application
Login to your Okta account -> Applications -> Applications
Figure 13: Create Okta application
Click on “Create App Integration”
Figure 14: Create Okta application 2
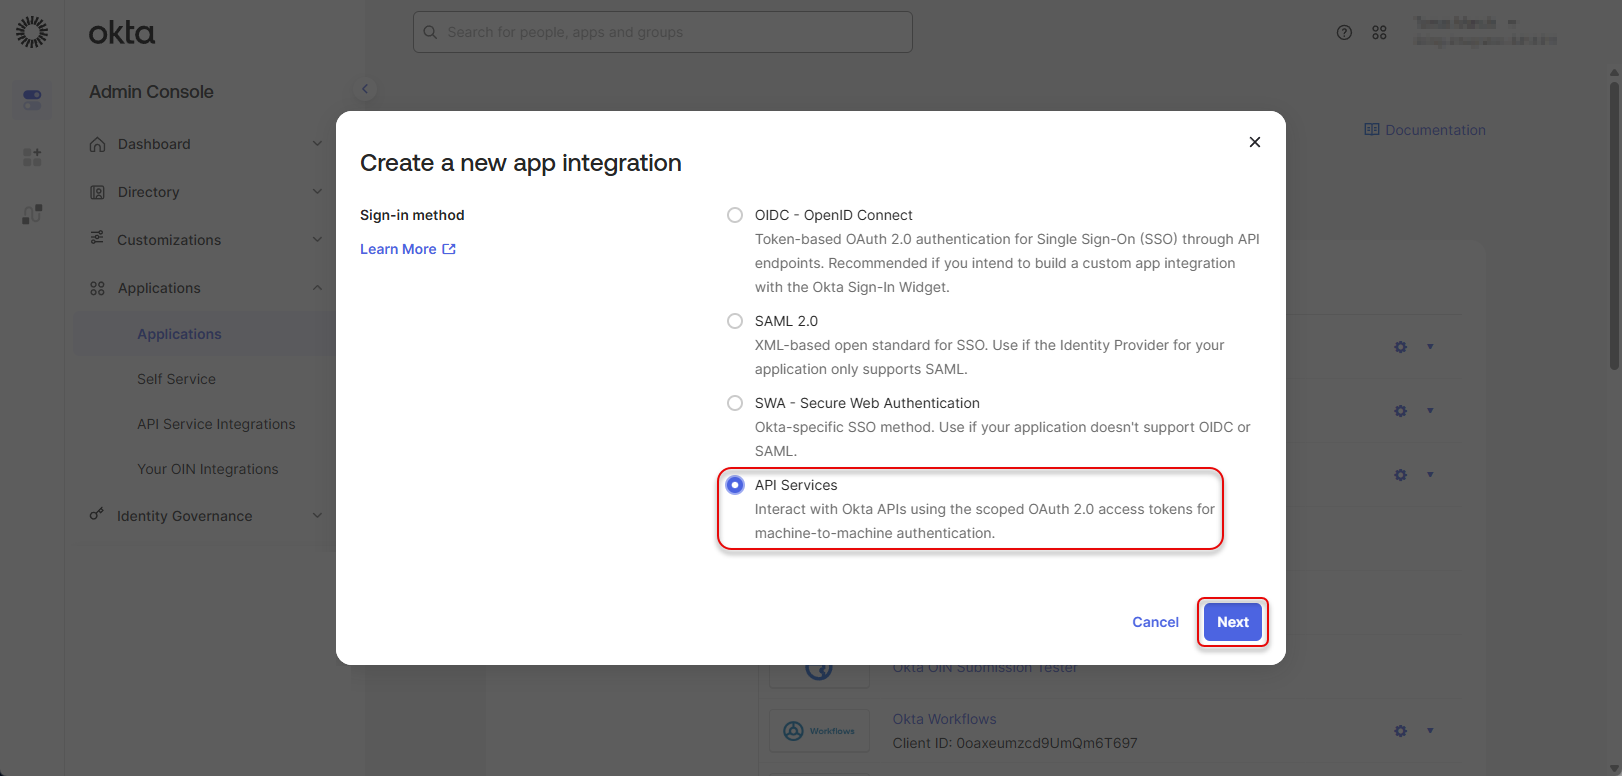
Select the “API Services” and click “Next”
Figure 15: Create Okta application 3
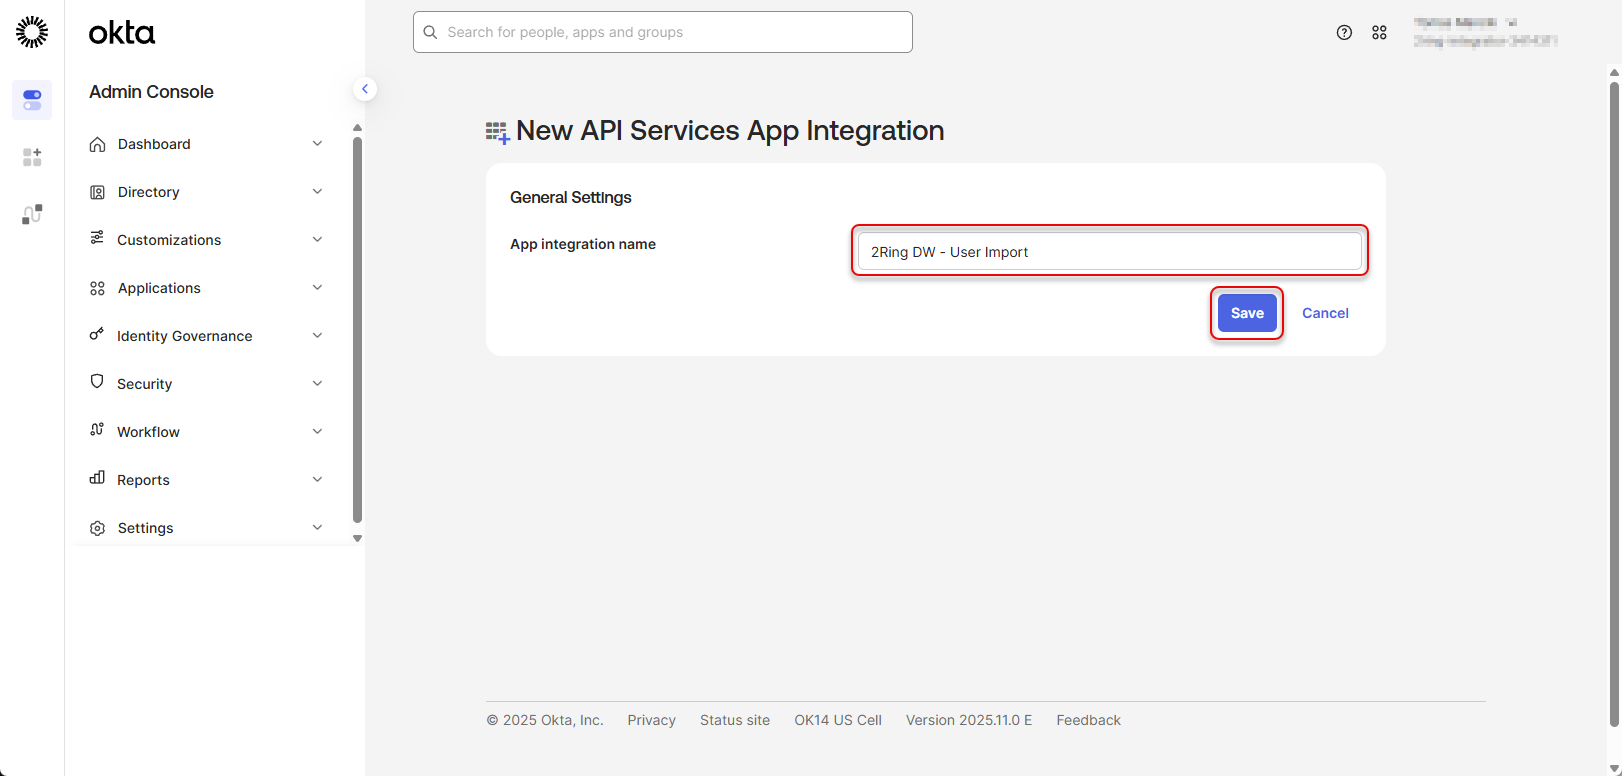
Fill the App integration name and click “Save”
Figure 16: Create Okta application 4
Configure Okta application
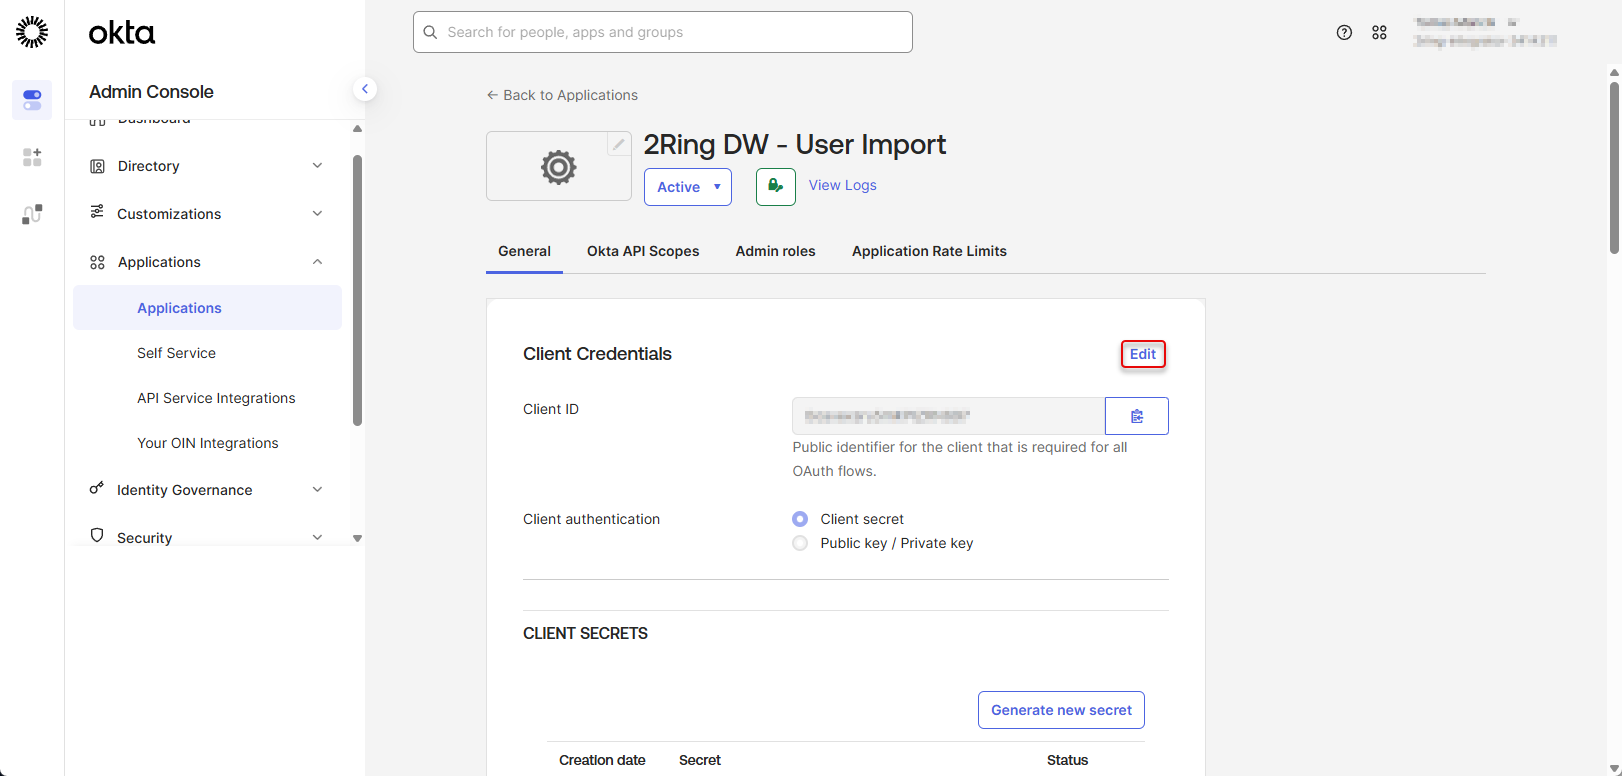
In the app details, in the Client Credentials section, click “Edit”
Figure 17: Configure Okta application
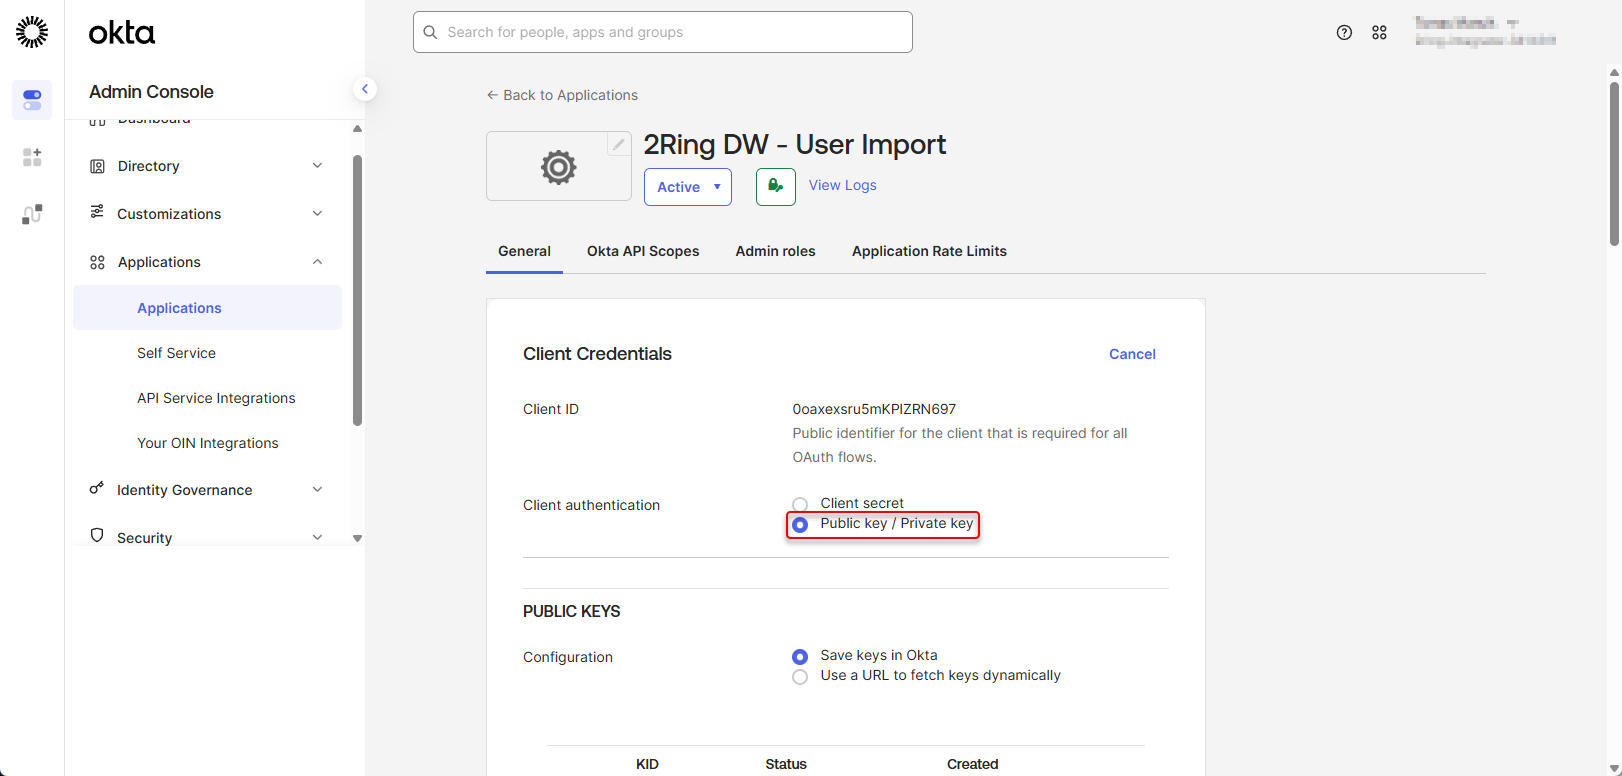
Copy the Client ID, you will need to provide it to 2Ring support later in the configuration process. Select the “Public key / Private key” Client authorization
Figure 18: Configure Okta application 2
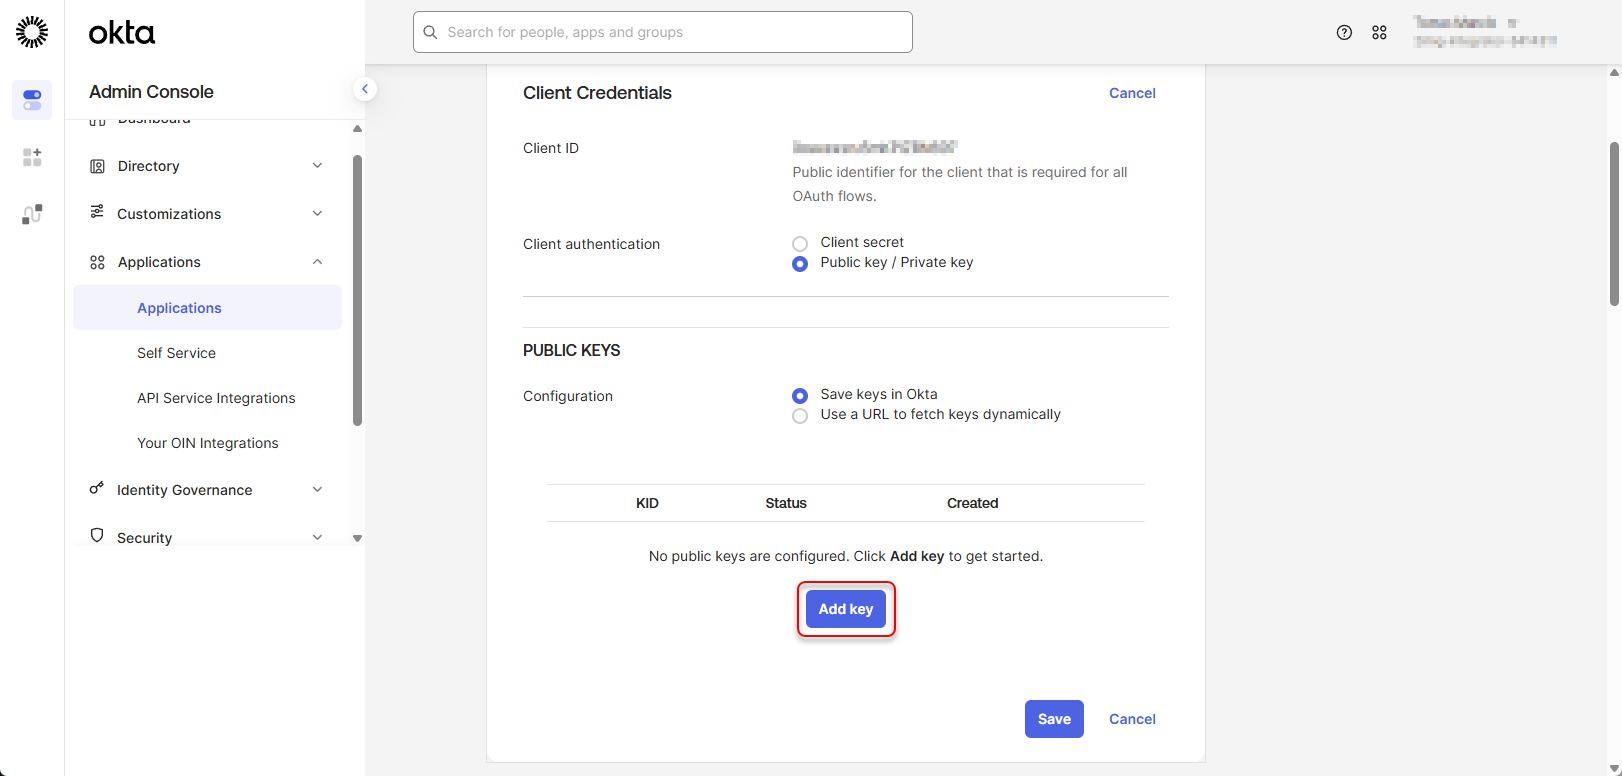
Click on “Add Key”
Figure 19: Configure Okta application 3
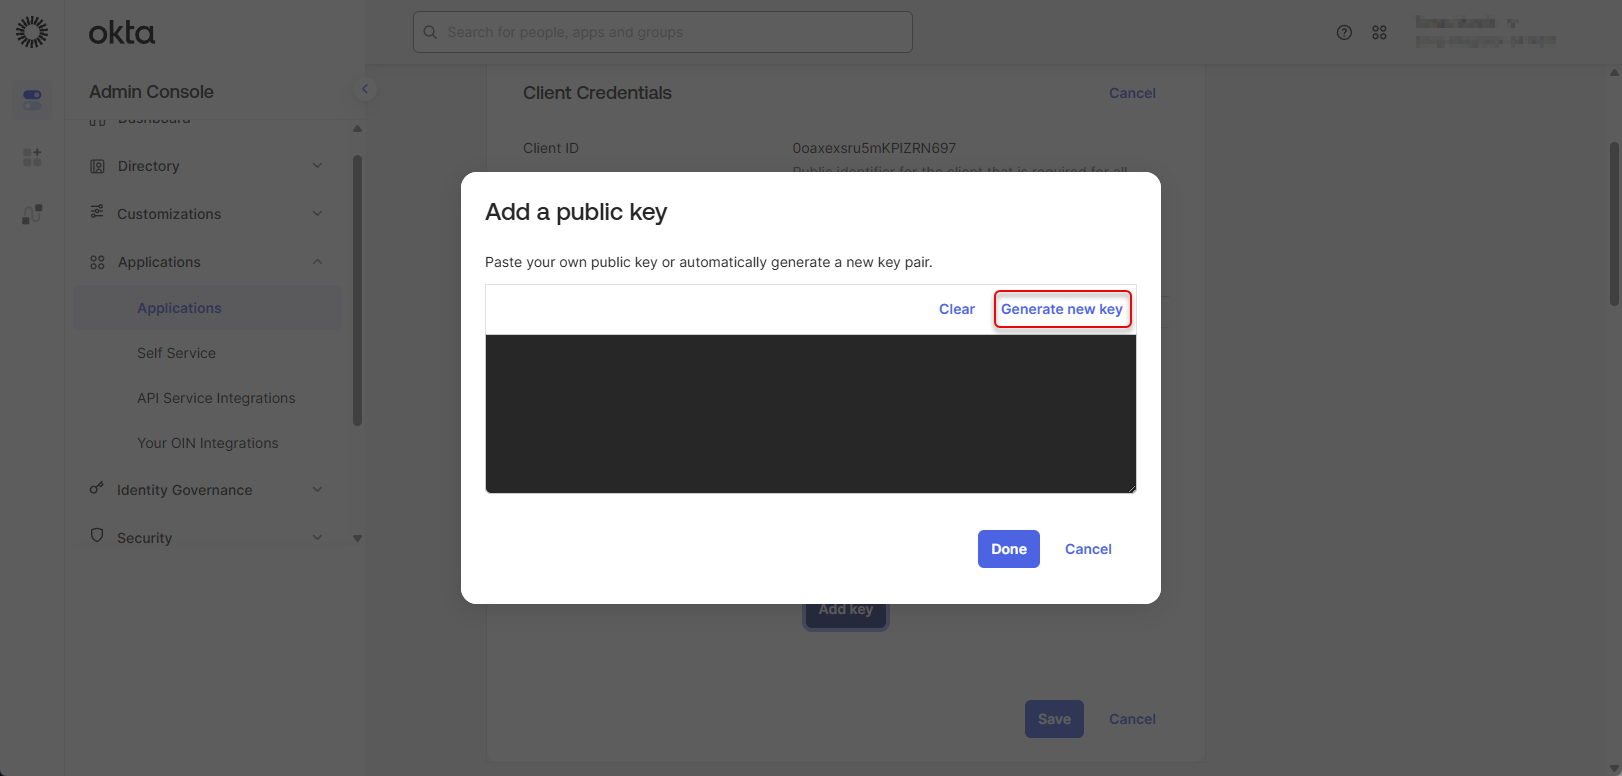
In the following dialog, click on “Generate new key”
Figure 20: Configure Okta application 4
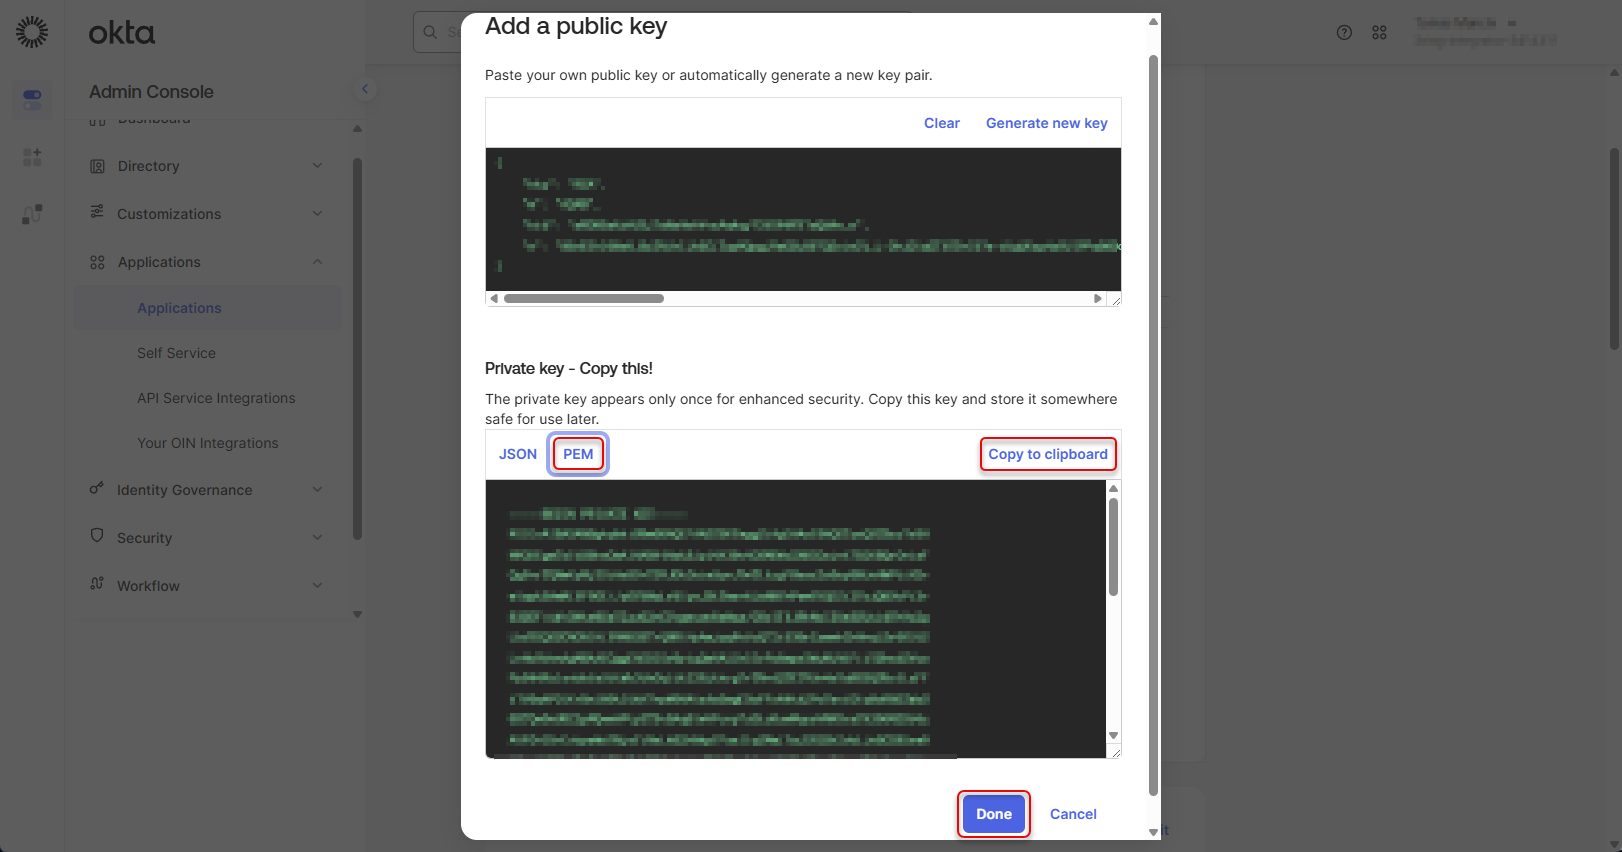
Switch the format of the private key to “PEM”, copy the value and click “Done”
Figure 21: Configure Okta application 5
Copy the PEM private key, you will need to provide it to 2Ring support later in the configuration process. Click “Save”
Figure 22: Configure Okta application 6
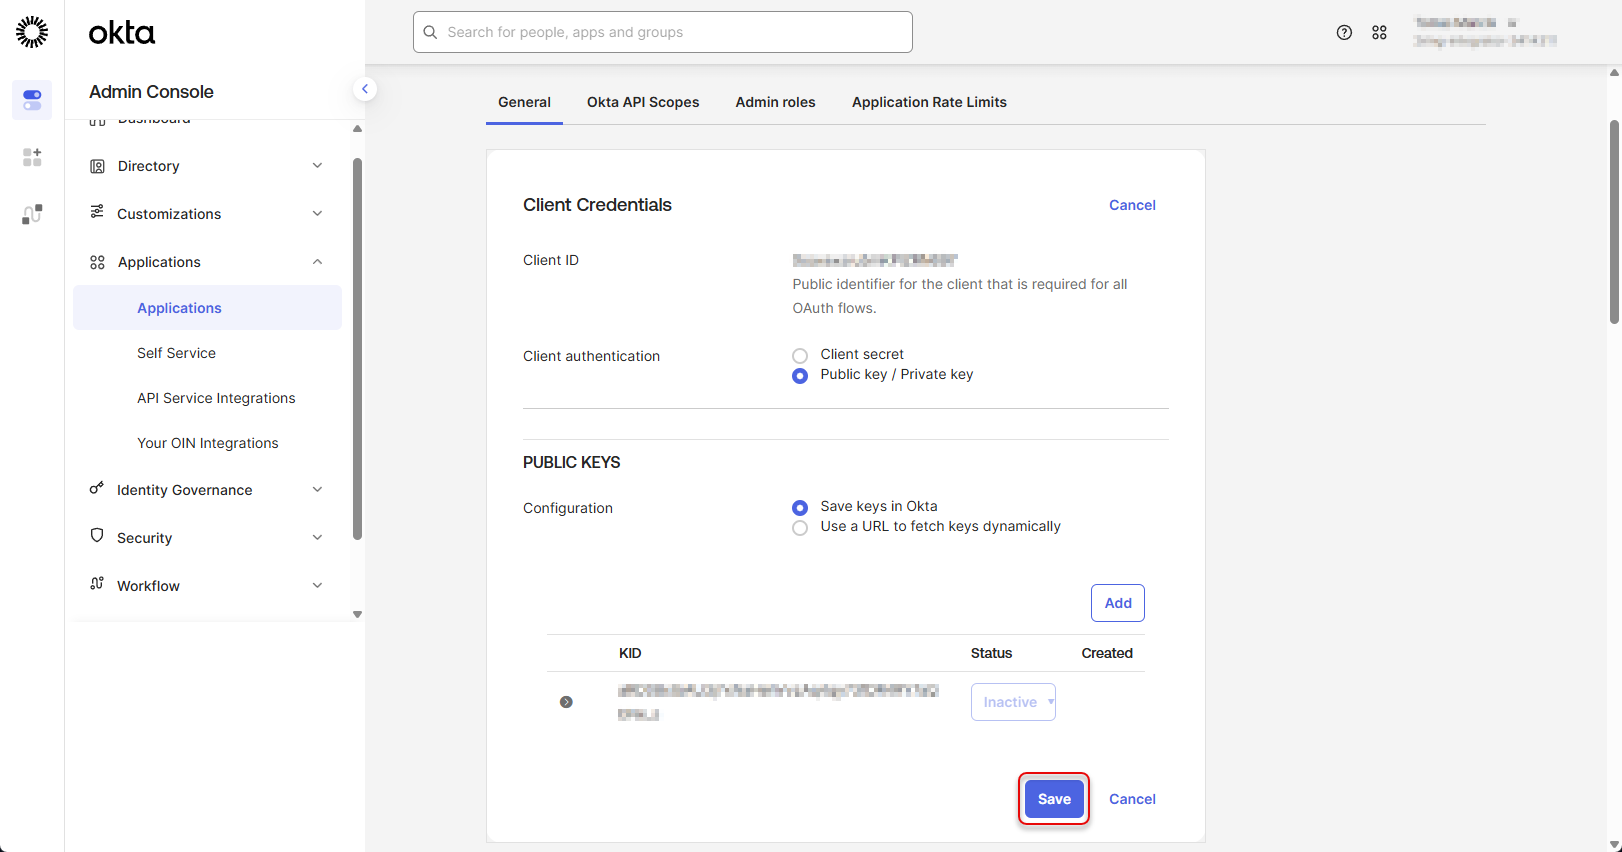
Confirm the Client authorization type by clicking “Save” again.
Figure 23: Configure Okta application 7
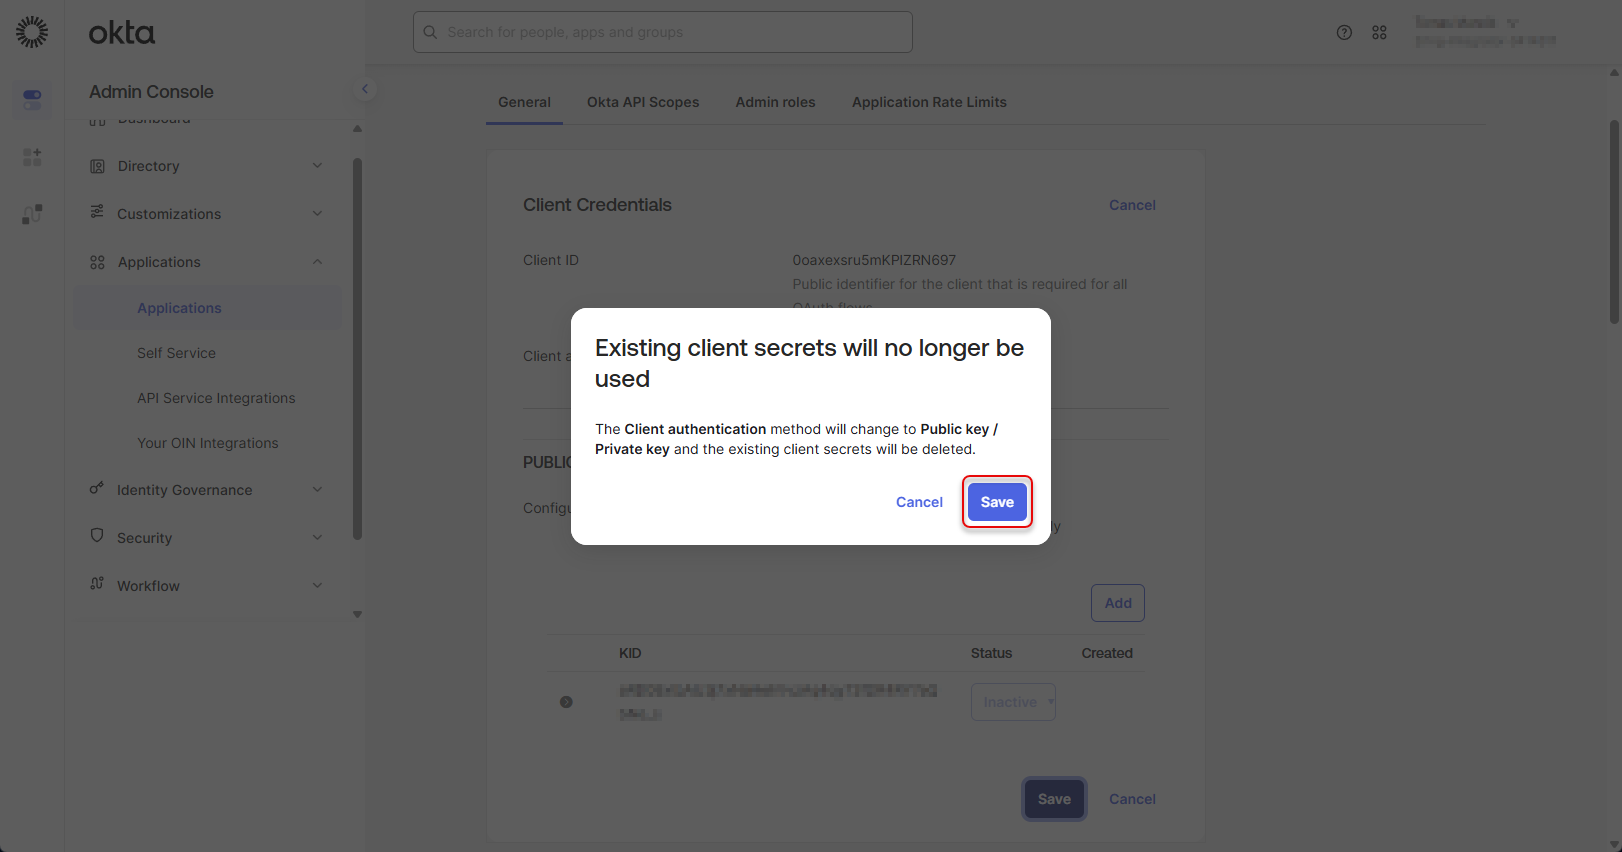
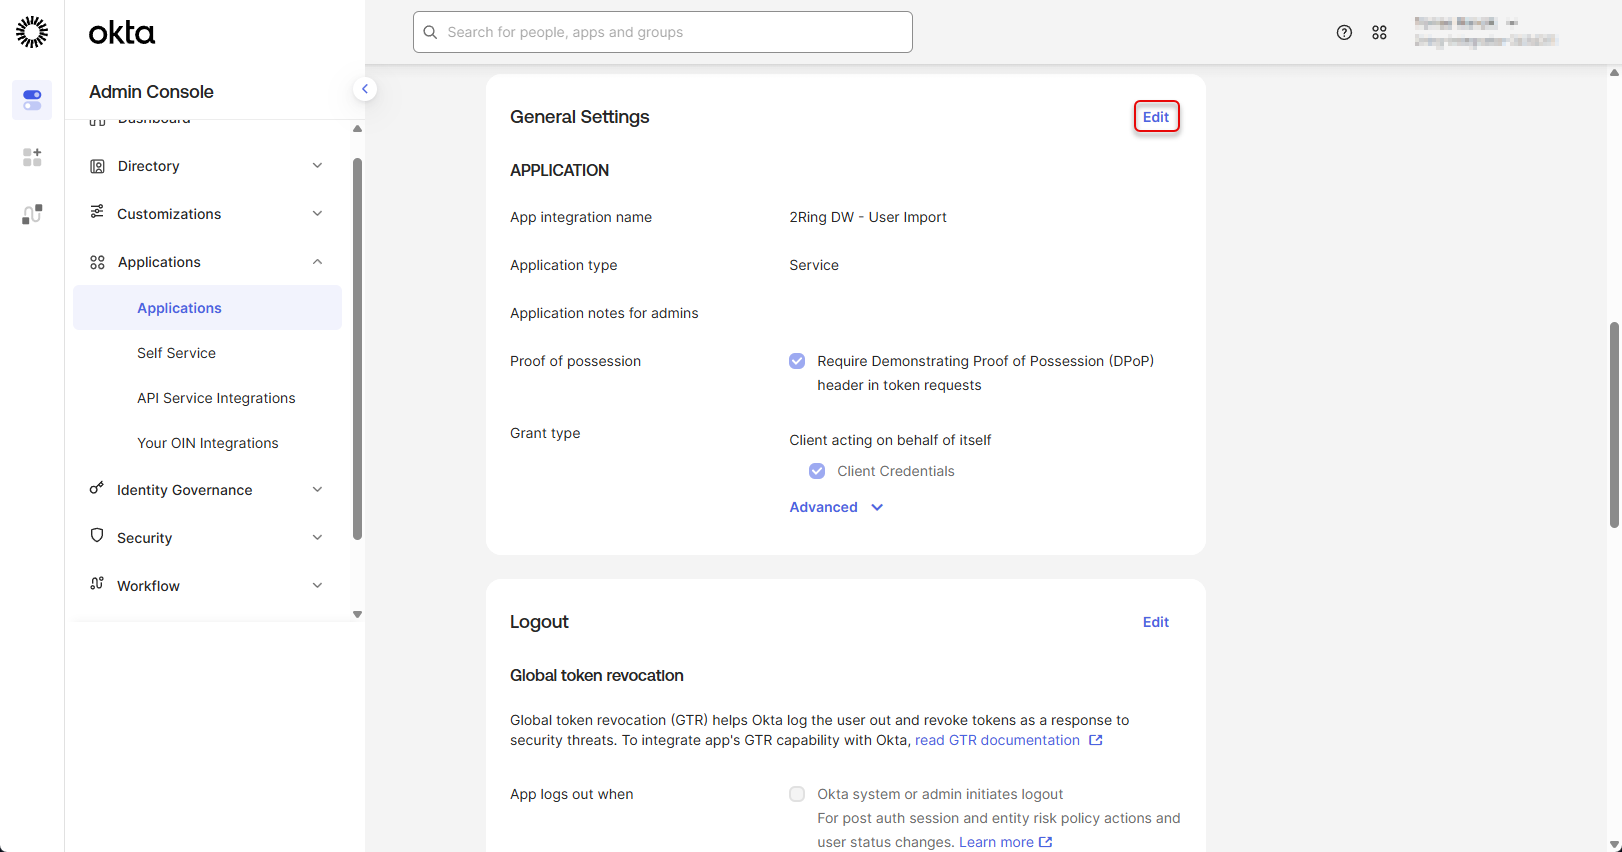
Only one key can be configured for the application. In case you need to rotate the key, you need to generate a new key and then retire the old one. In the app details, in the General Settings section, click “Edit”
Figure 24: Configure Okta application 8
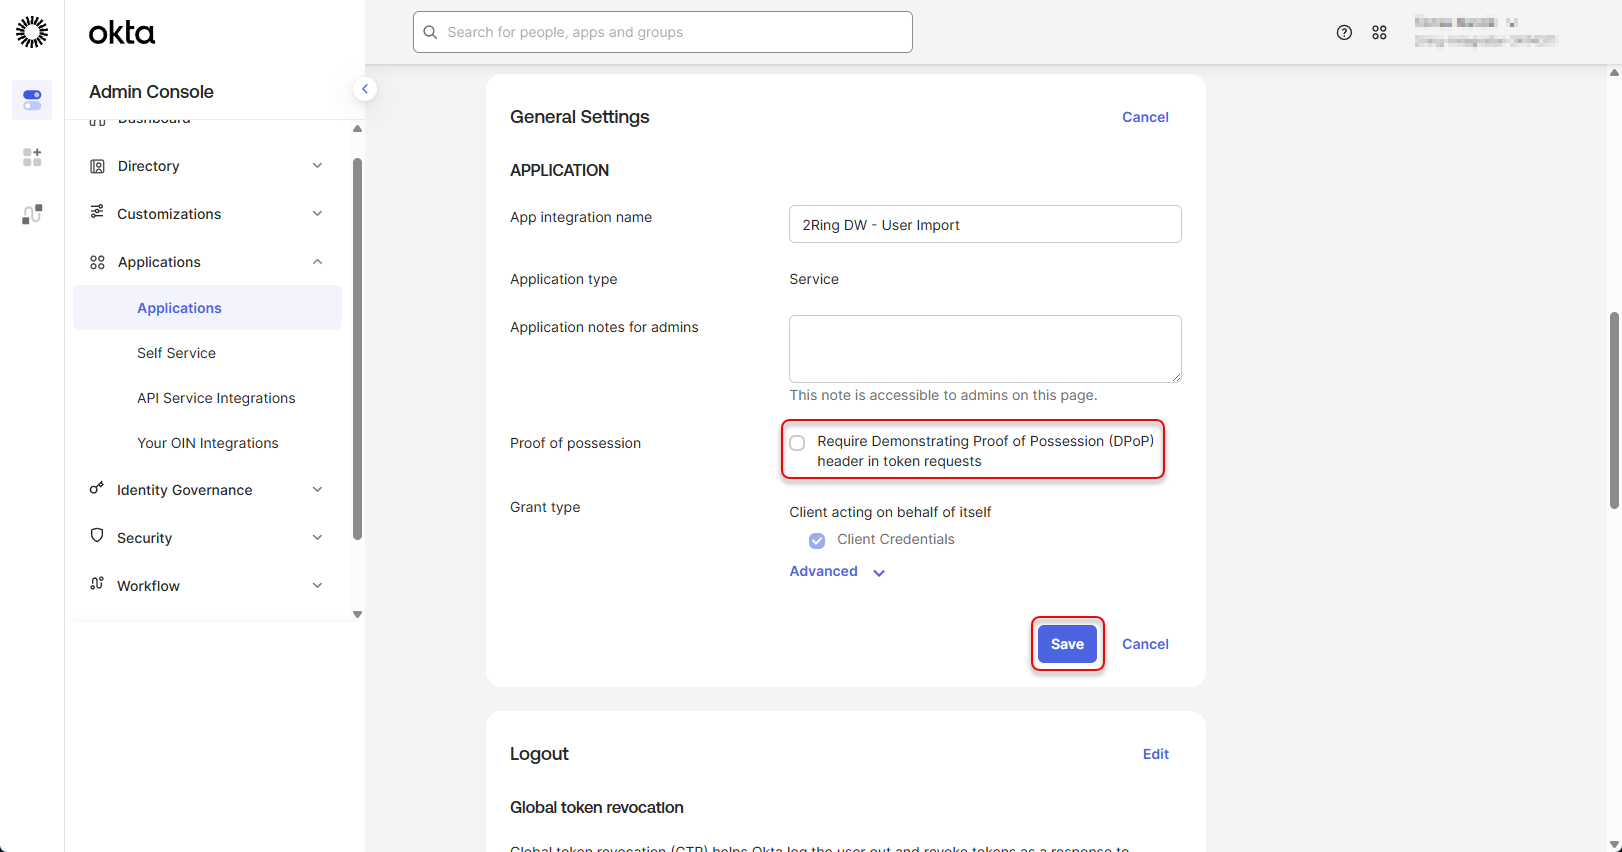
Uncheck “Require Demonstrating Proof of Possession (DPop) header in token requests” and click Save
Figure 25: Configure Okta application 9
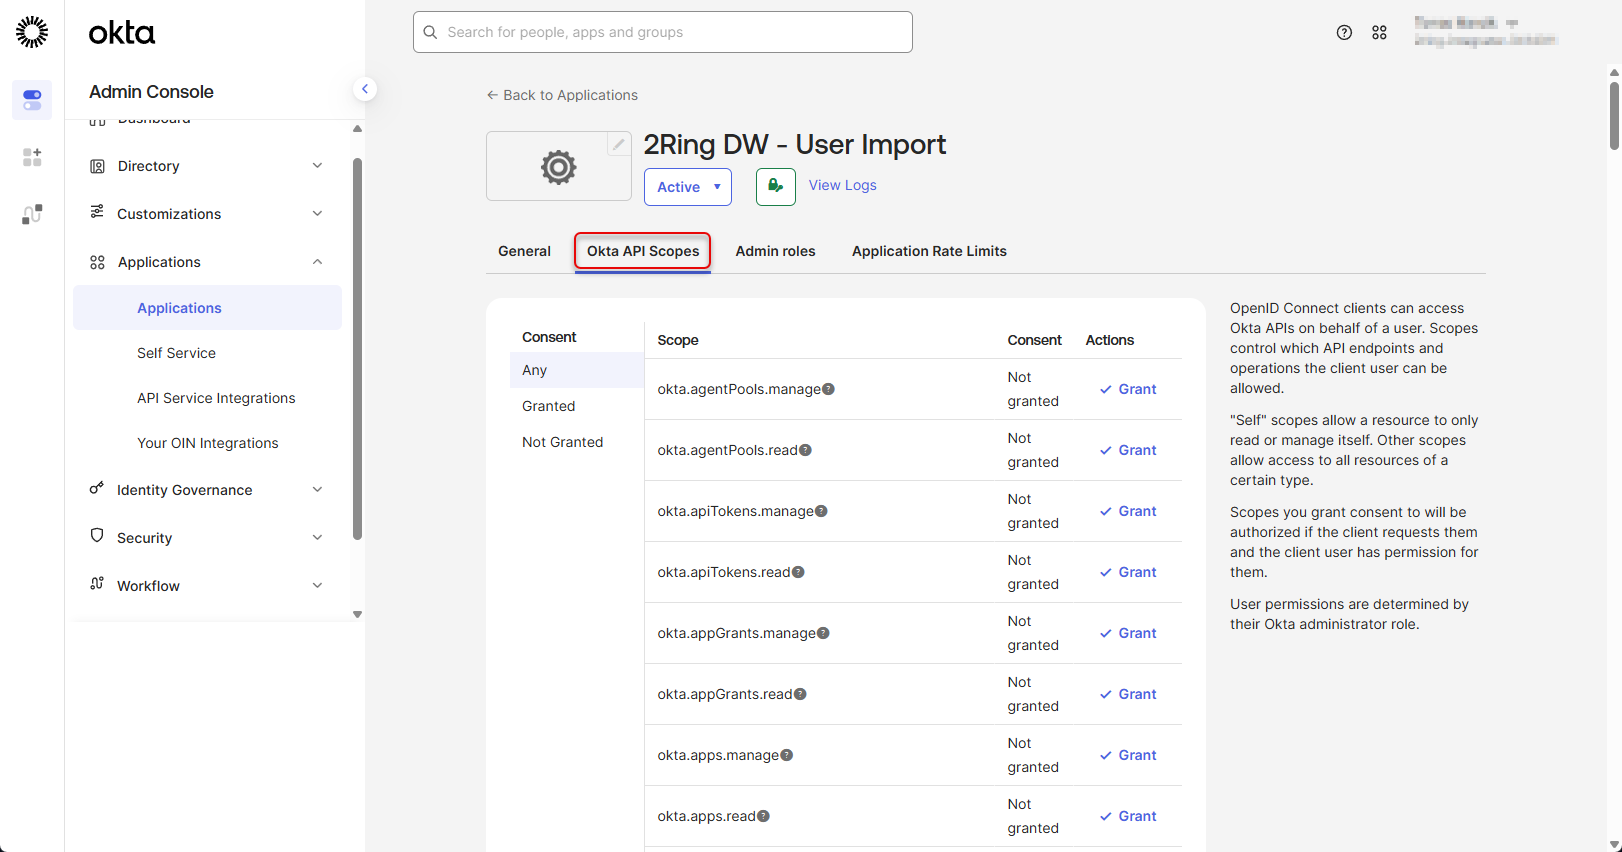
In the application detail, switch to the “Okta API Scopes” tab
Figure 26: Configure Okta application 10
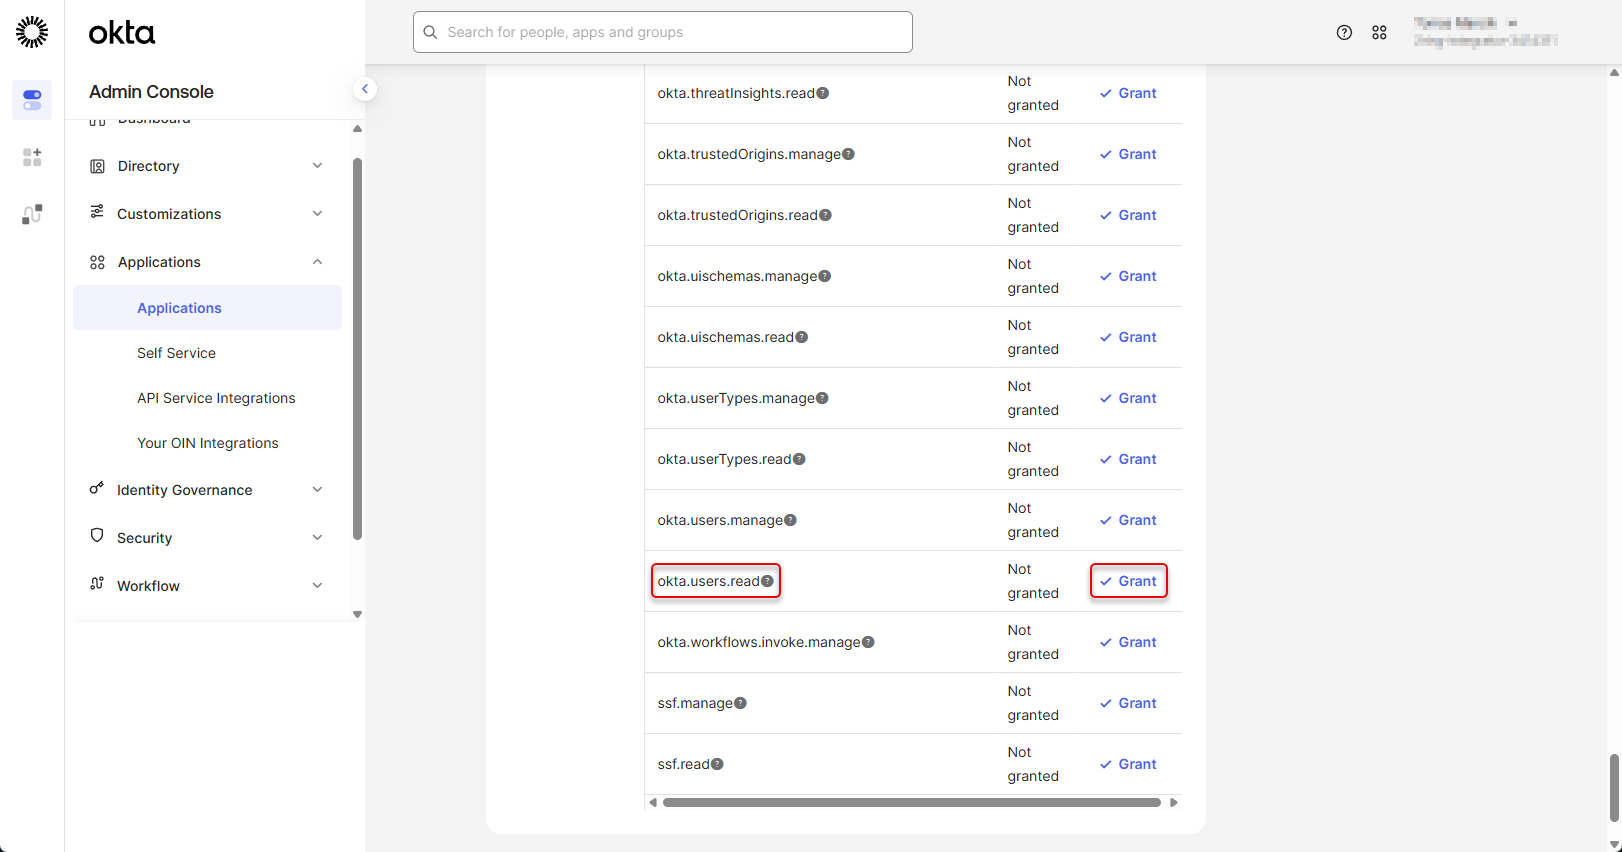
Scroll down and grant the “okta.users.read” permission.
Figure 27: Configure Okta application 11
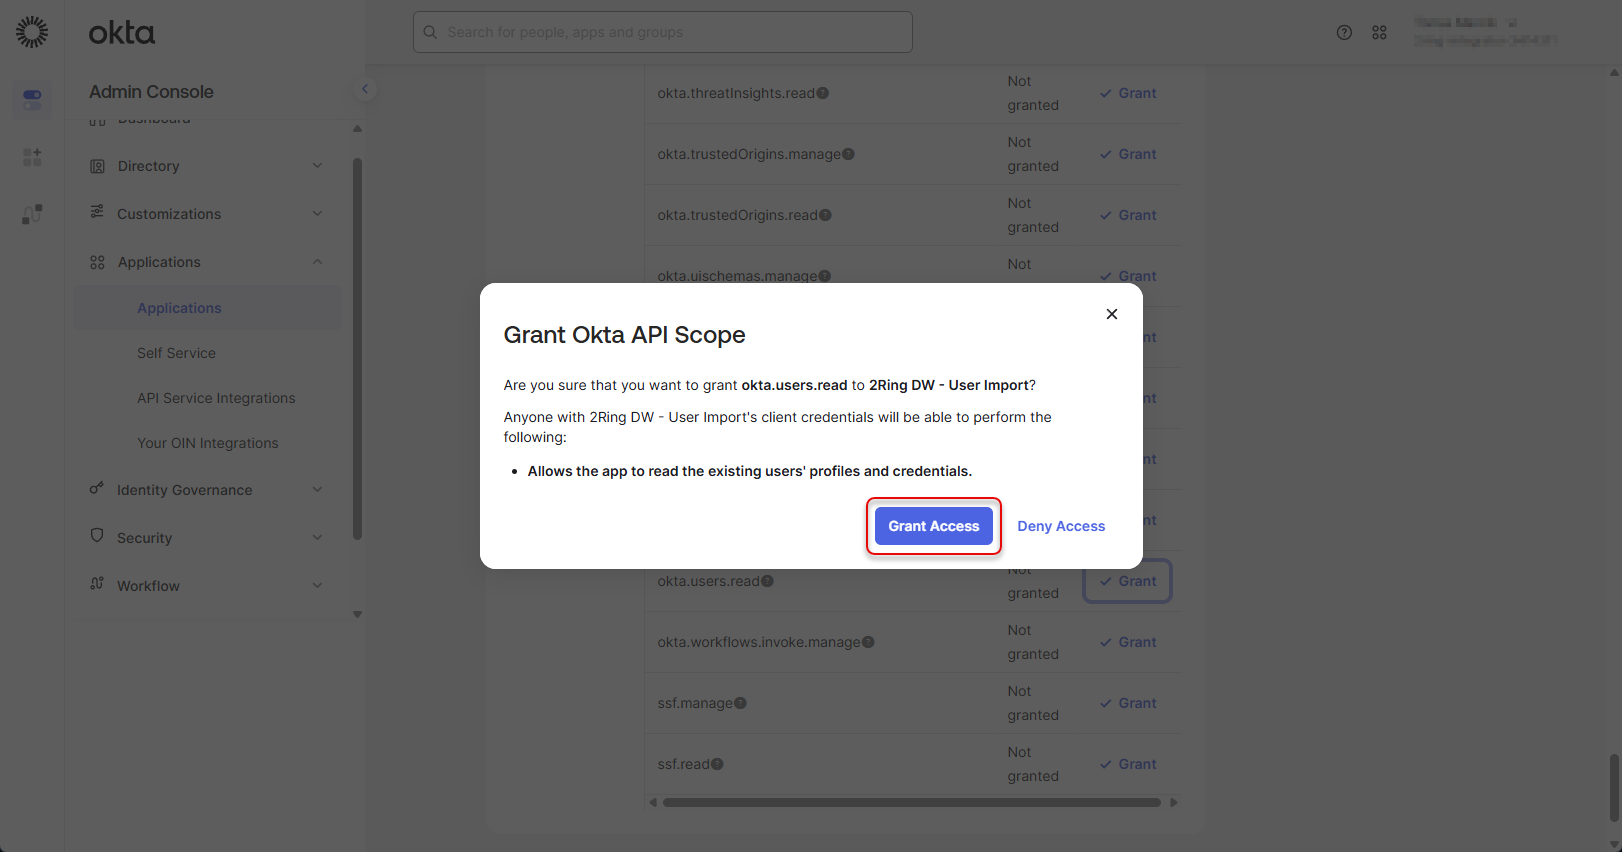
Confirm that you want to grant this permission to created application.
Figure 28: Configure Okta application 12
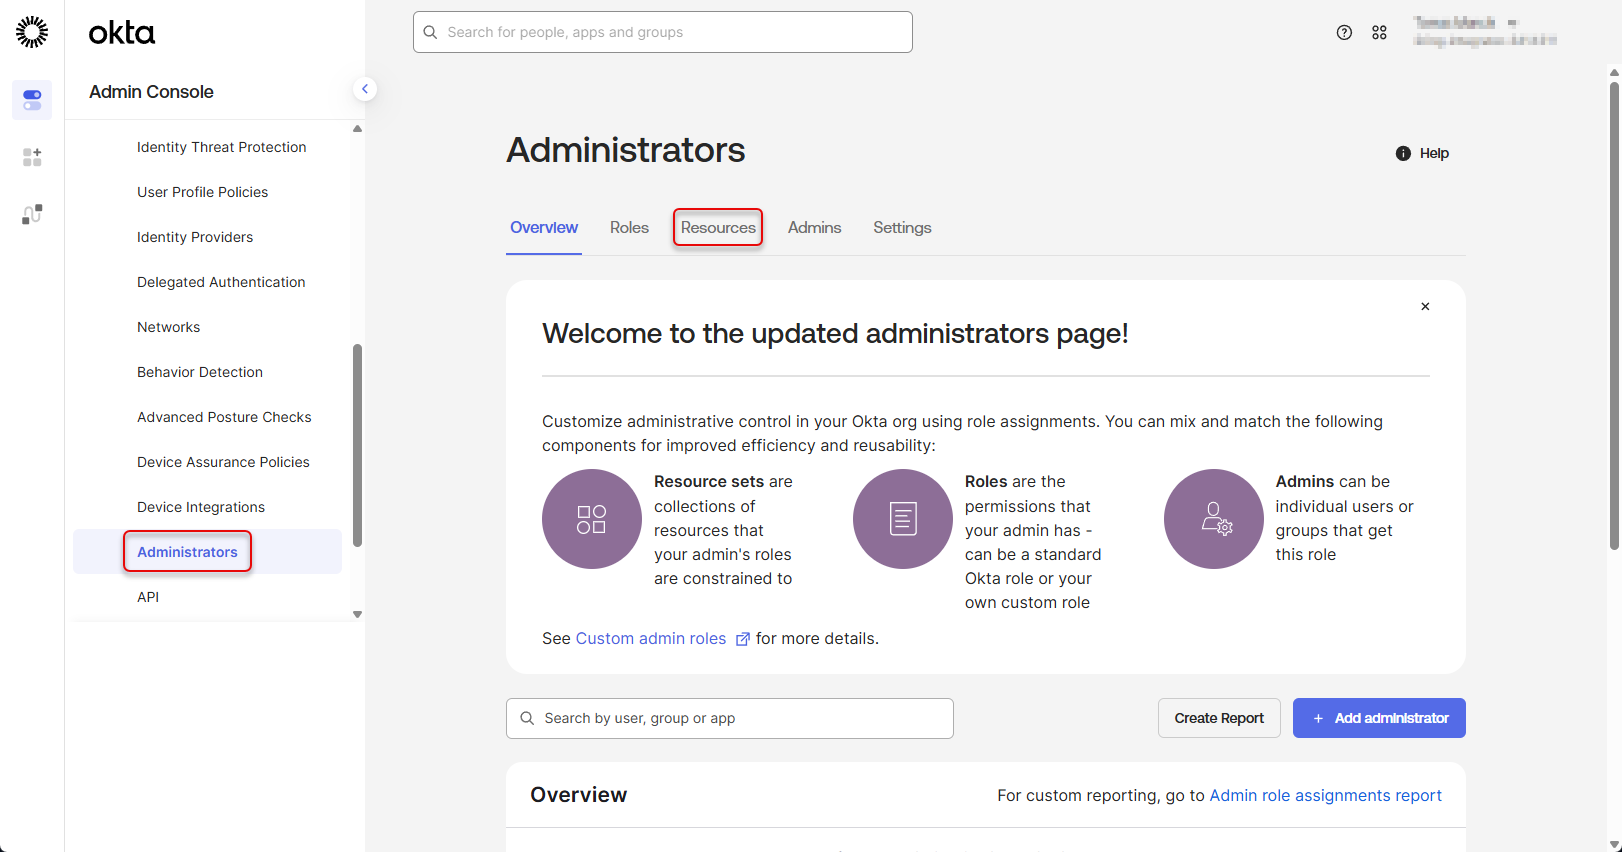
Navigate to “Security” -> “Administrators” and switch to the “Resources” tab.
Figure 29: Configure Okta application 13
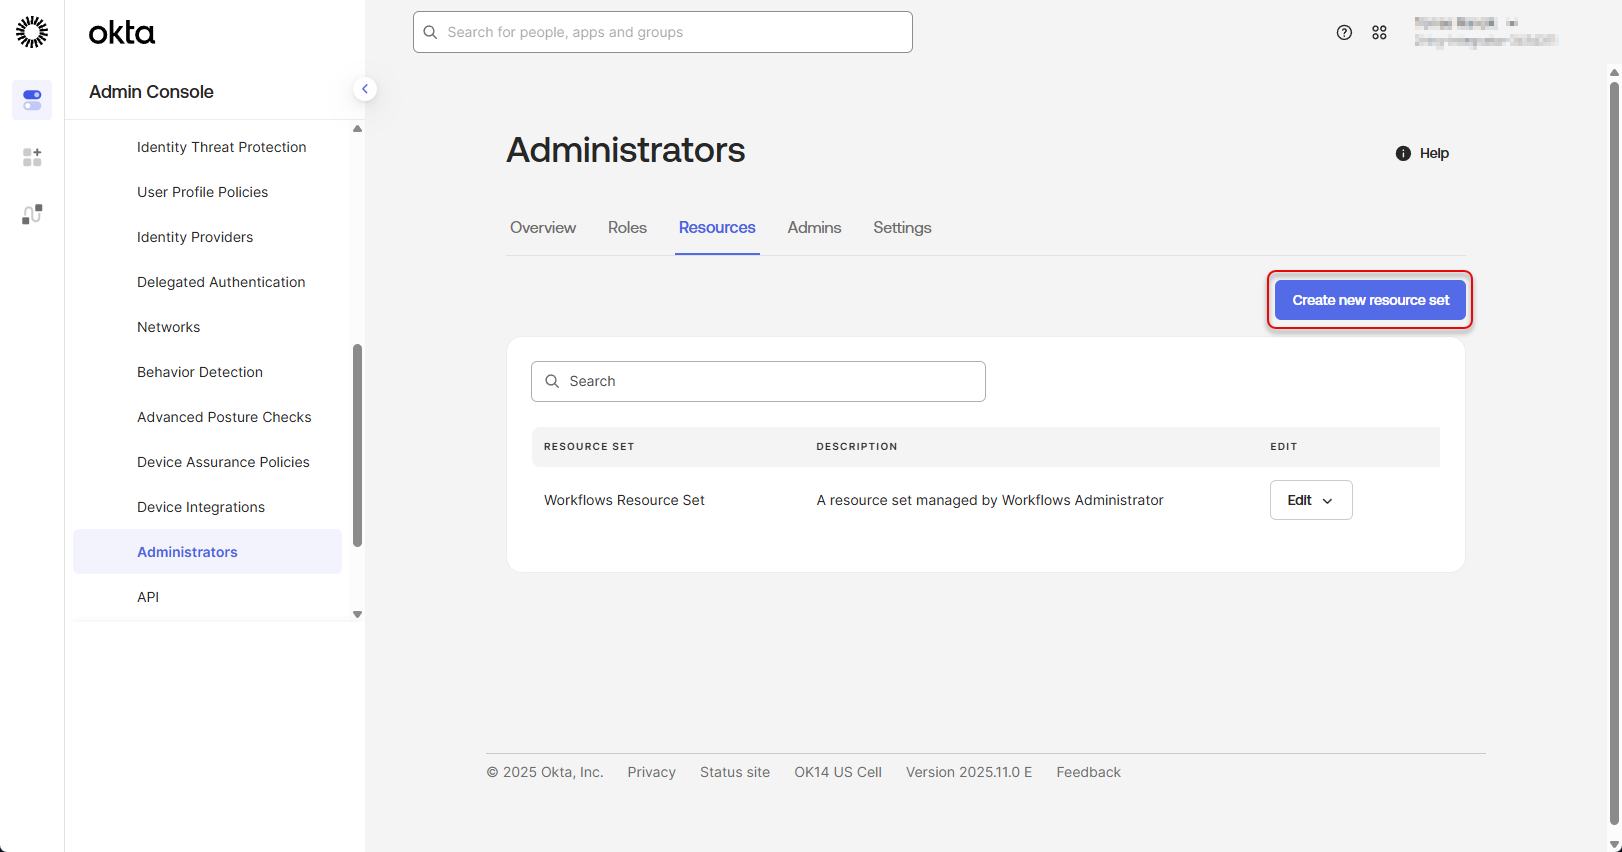
Click on “Create new resource set” button.
Figure 30: Configure Okta application 14
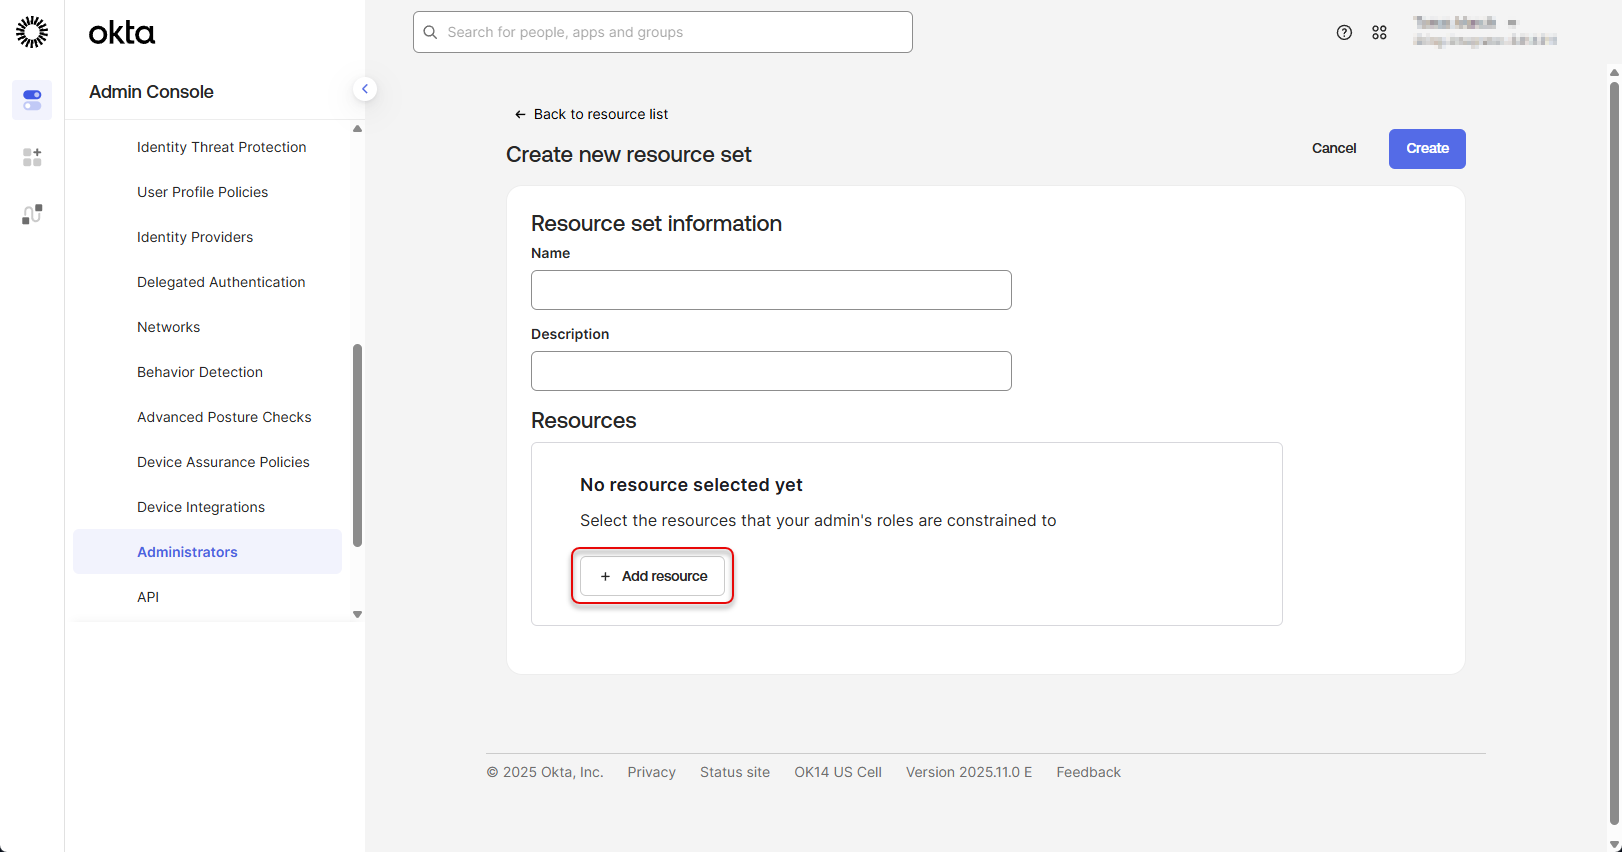
Click on “Add resources” button.
Figure 31: Configure Okta application 15
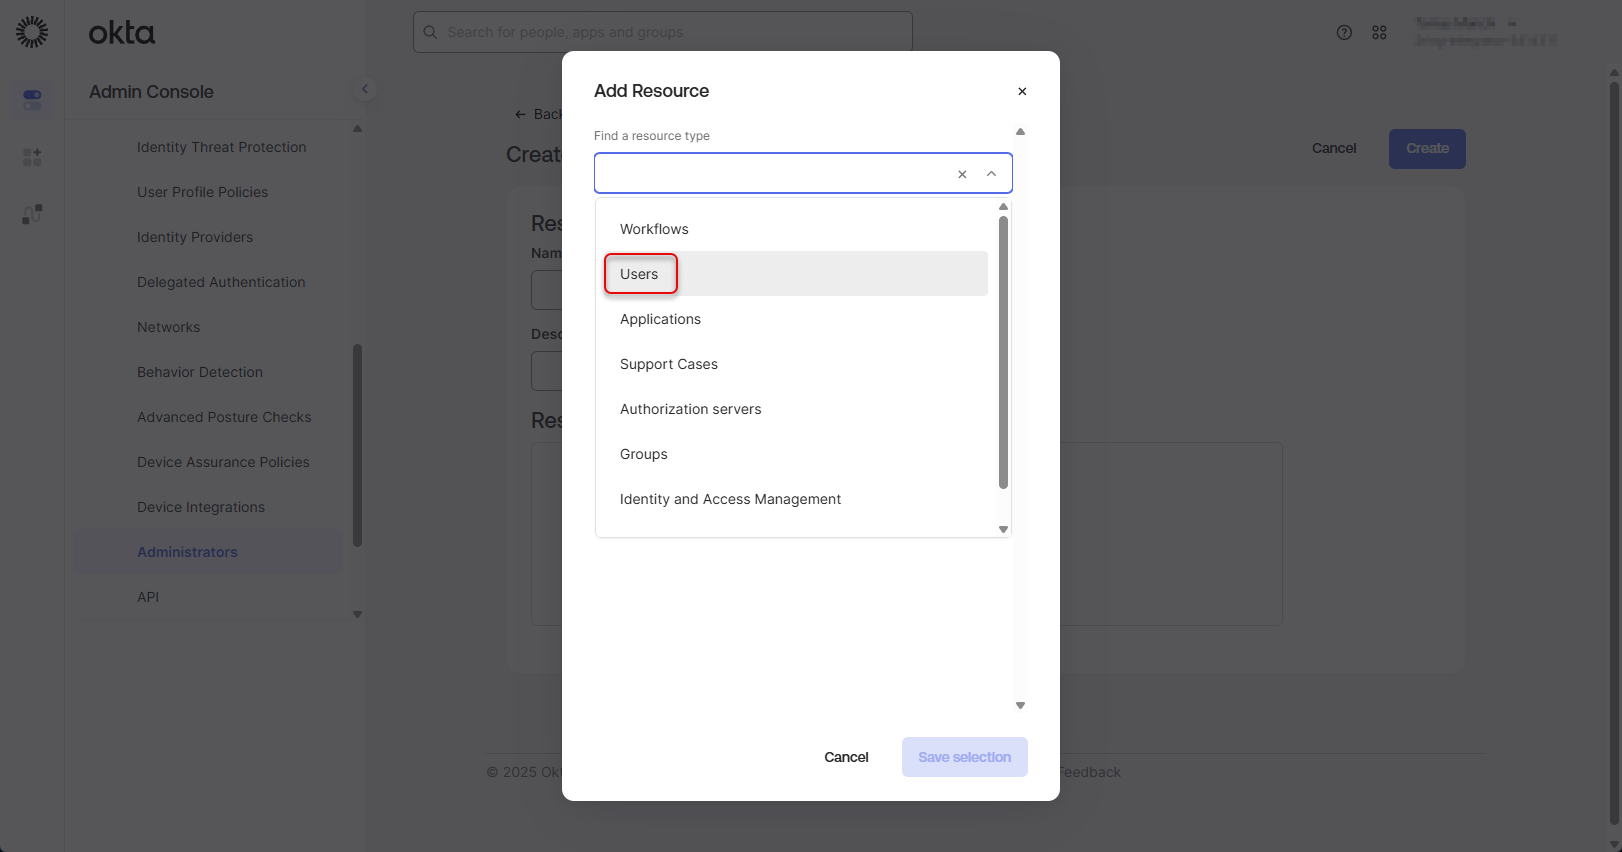
Select the “Users” resource type.
Figure 32: Configure Okta application 16
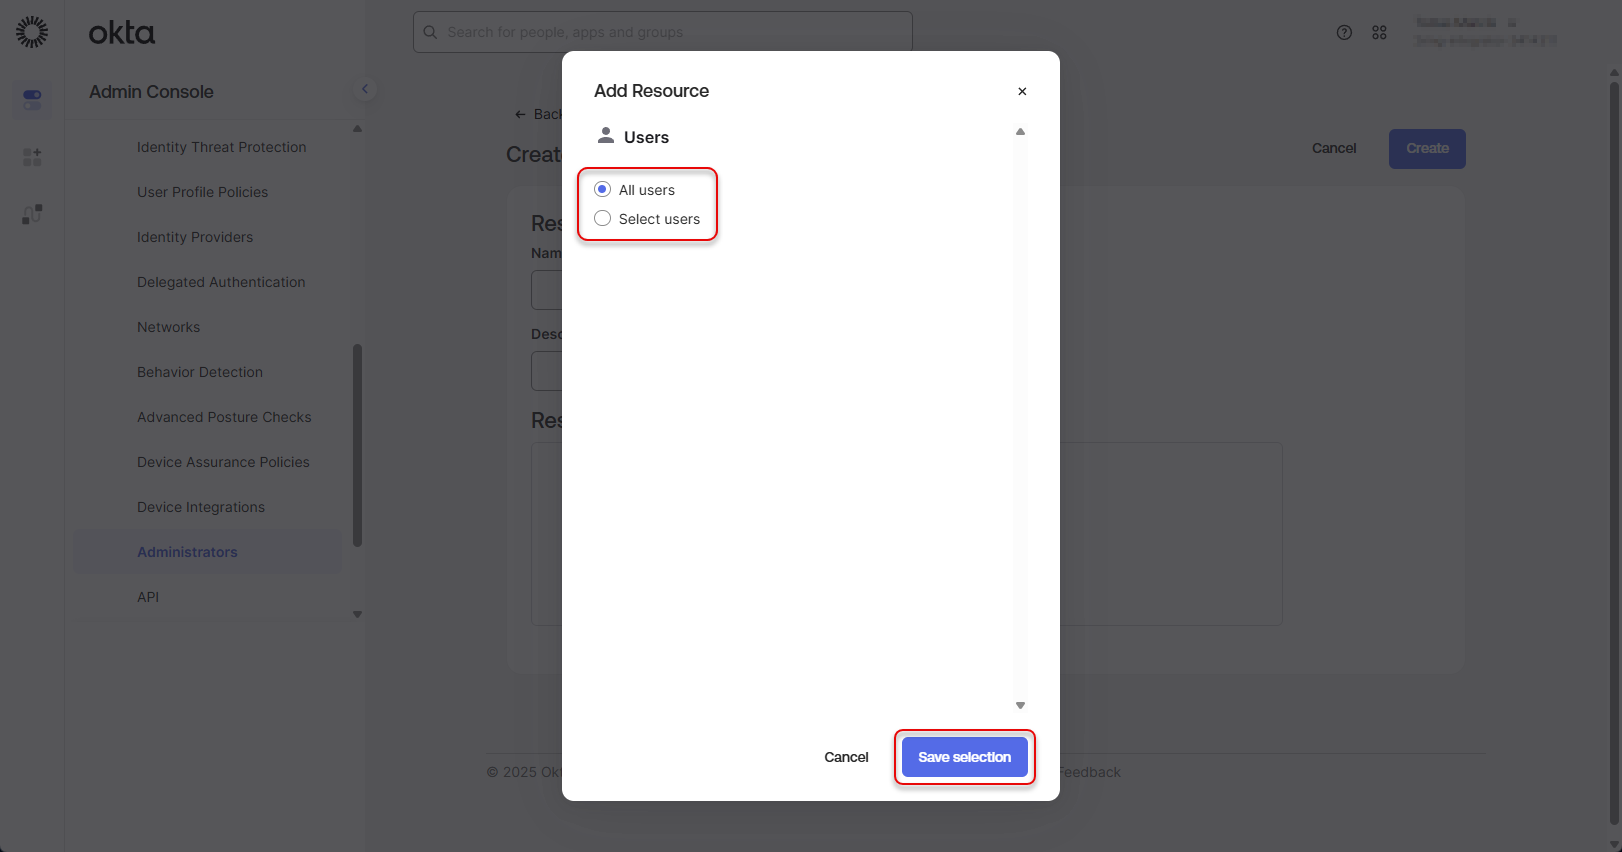
Choose whether All users or specific group of users should be able to be imported into the DW application and click “Save selection”.
For more information see Creating groups of users section.
Figure 33: Configure Okta application 17
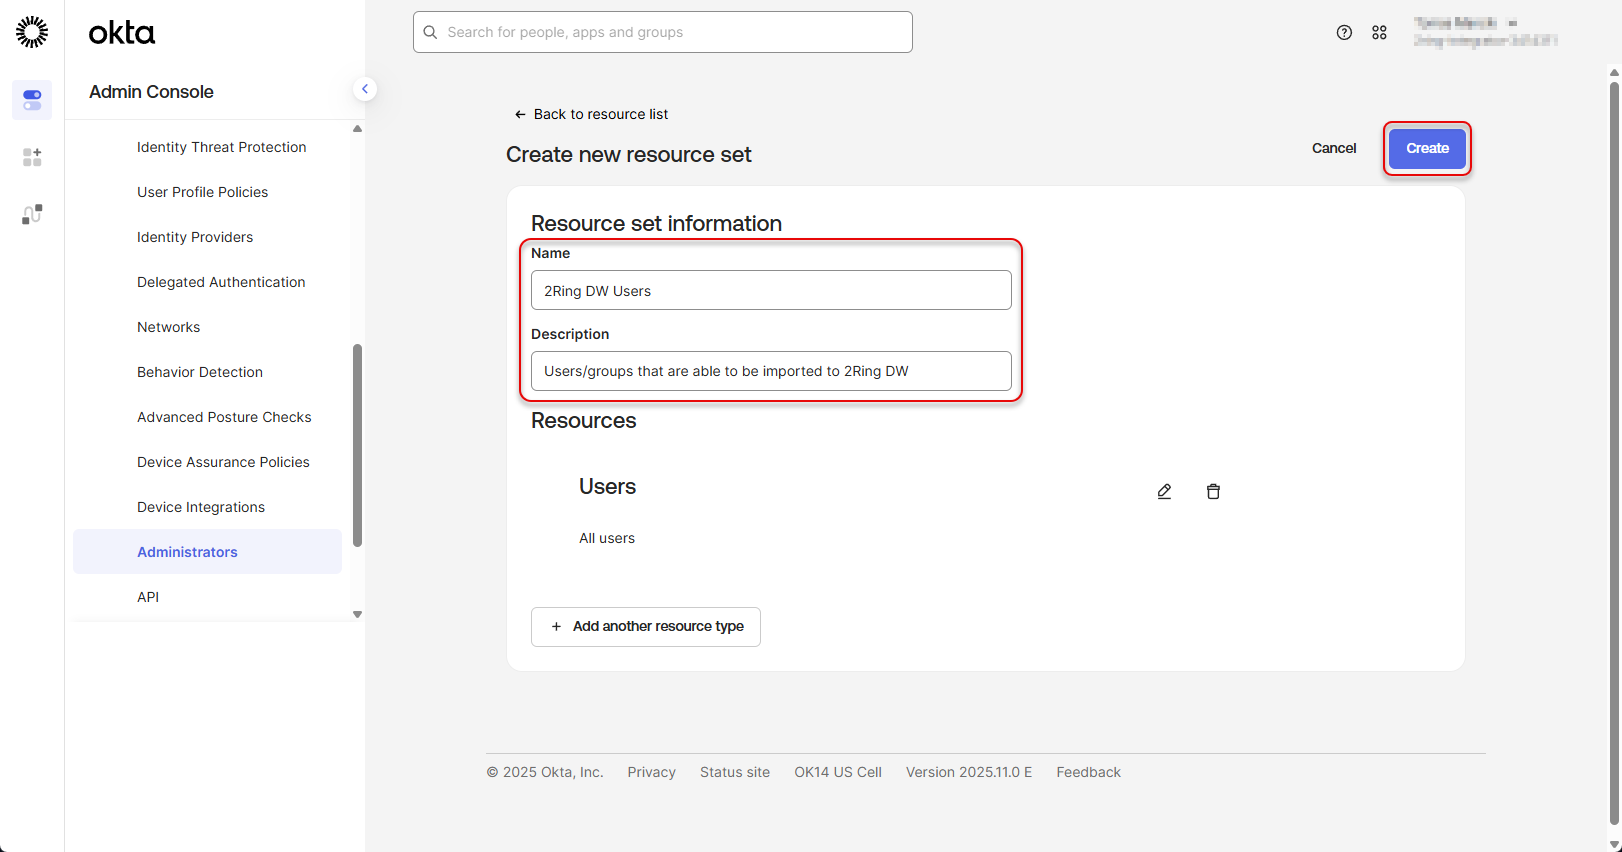
Fill the “Name” and “Description” fields and click “Create”.
Figure 34: Configure Okta application 18
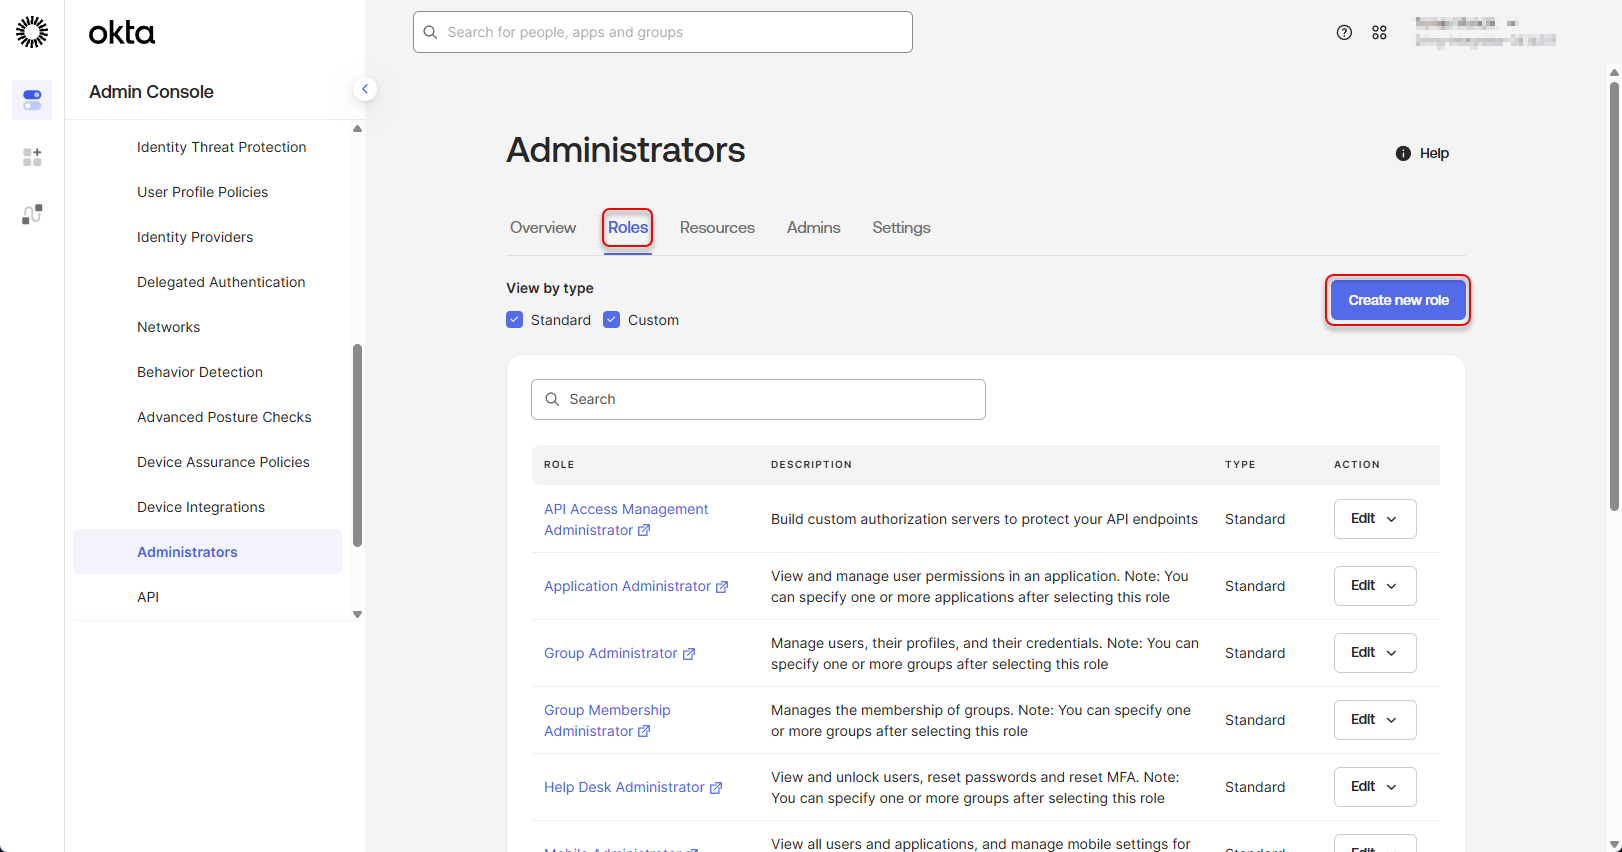
Switch to the Roles tab and click “Create new role” button.
Figure 35: Configure Okta application 19
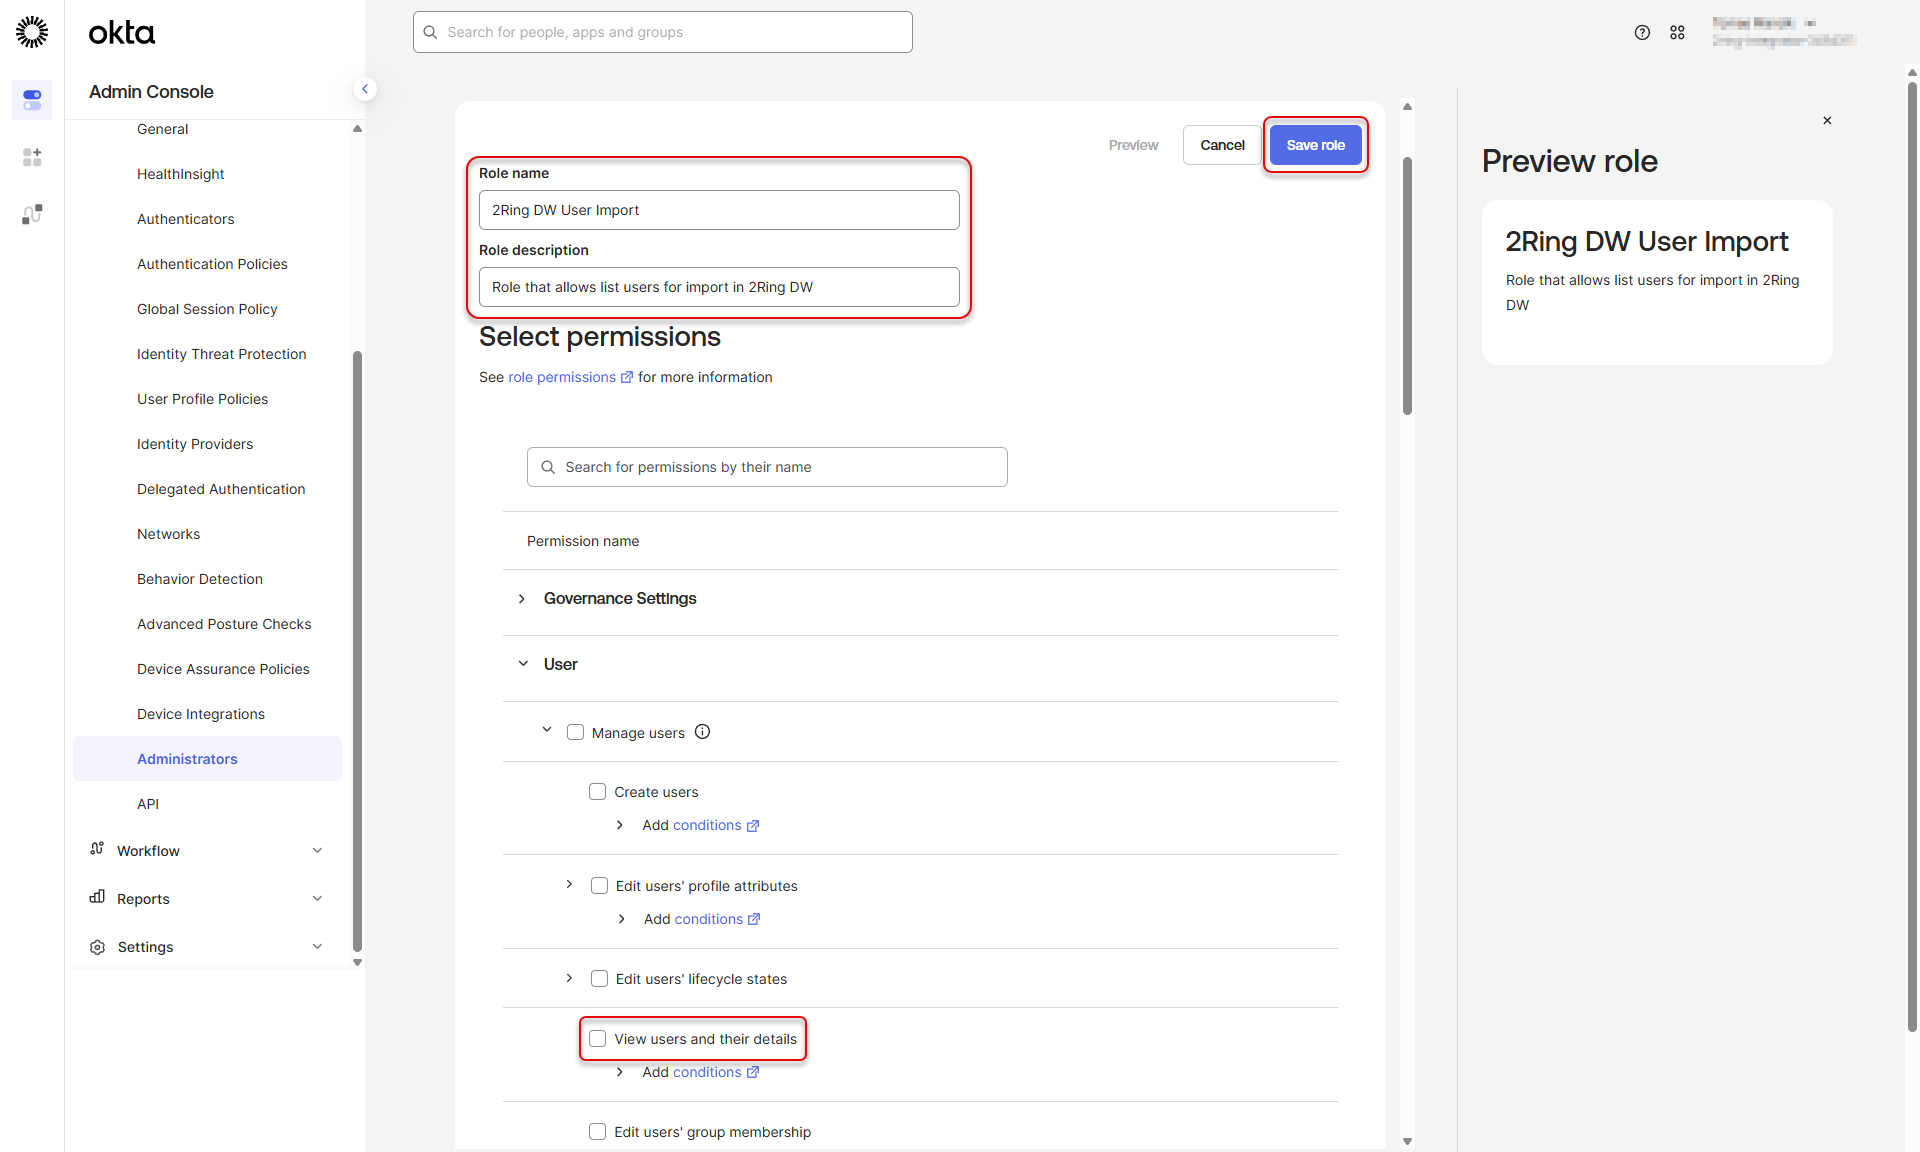
Fill the “Name” and “Description” fields, search for the “View users and their details” permission, check the checkbox and click “Save role” button.
In case of using groups of users, the “View groups and their details” permission is also needed to be assigned to the role.
Figure 36: Configure Okta application 20
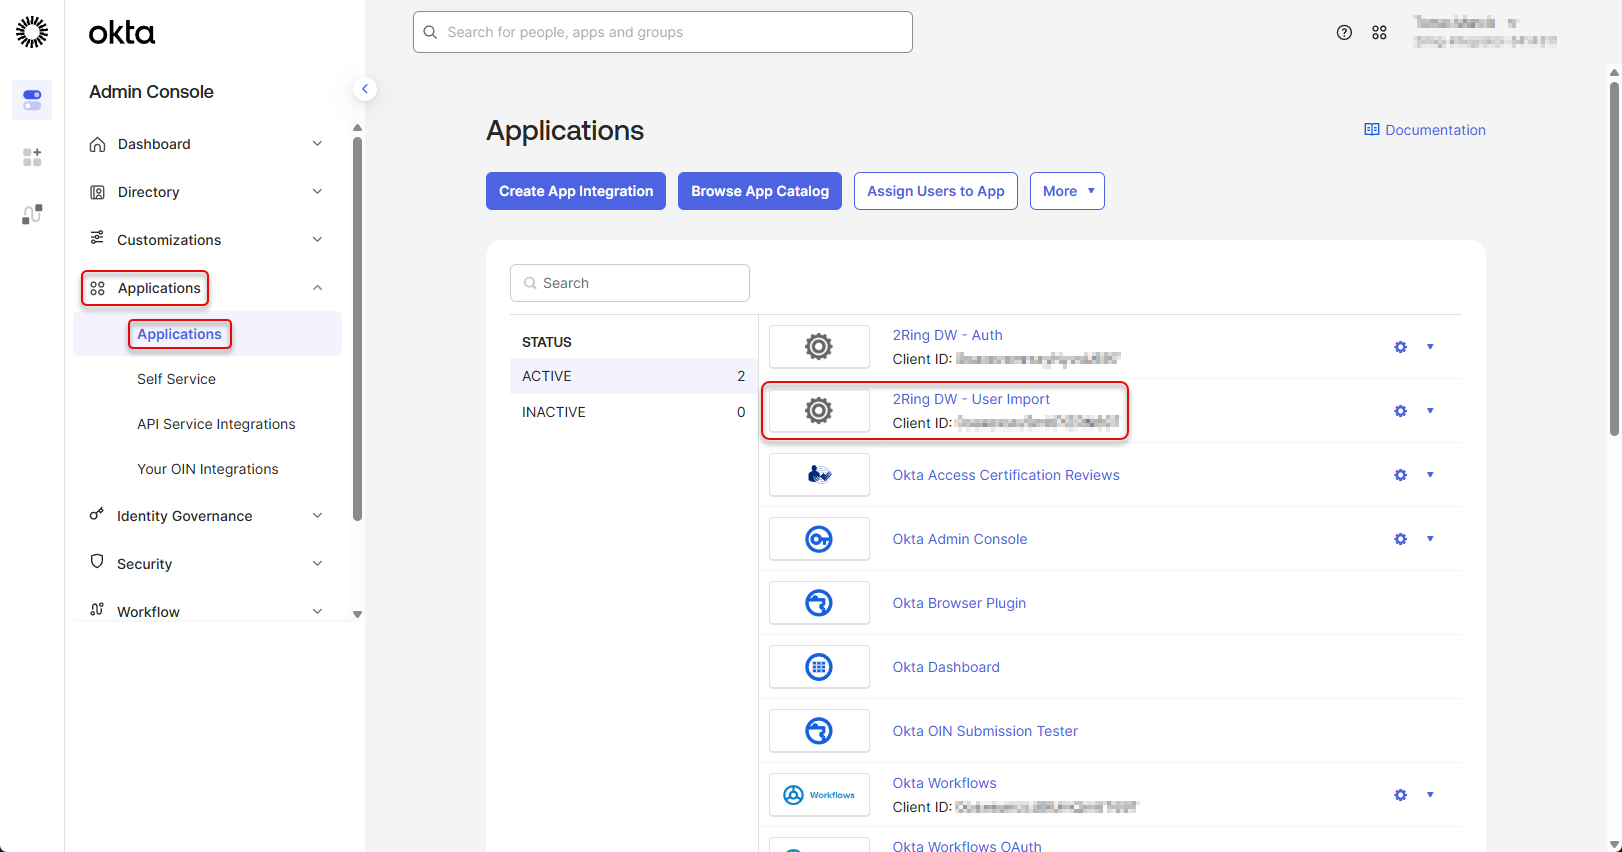
Navigate back to the “Applications” -> “Applications” and click on the “2Ring DW - User Import” application.
Figure 37: Configure Okta application 21
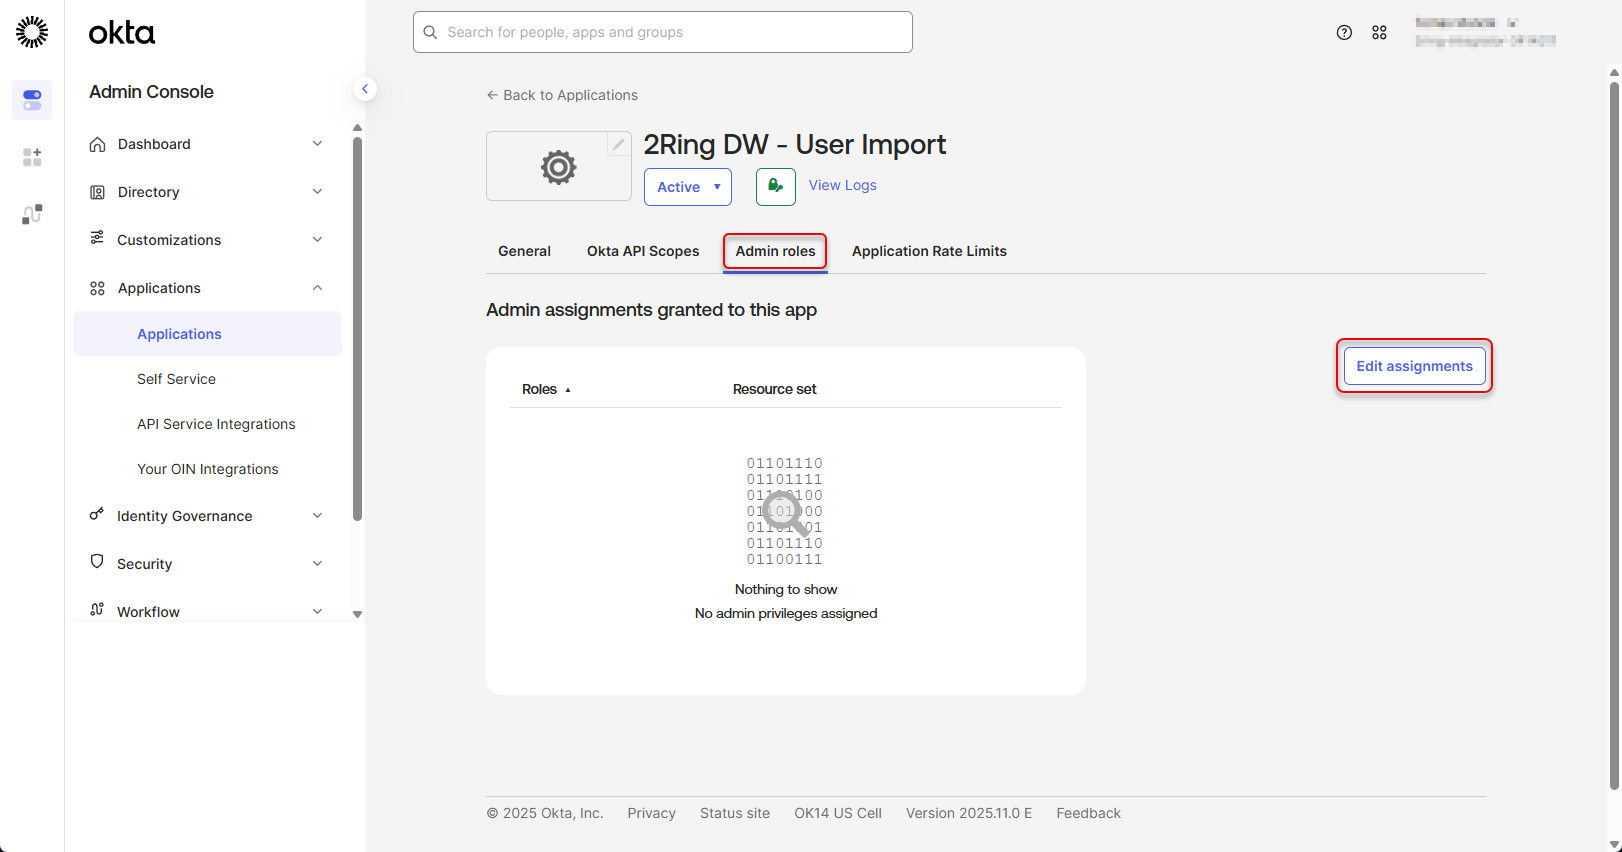
Switch to the “Admin Roles” tab and click the “Edit assignments” button.
Figure 38: Configure Okta application 22
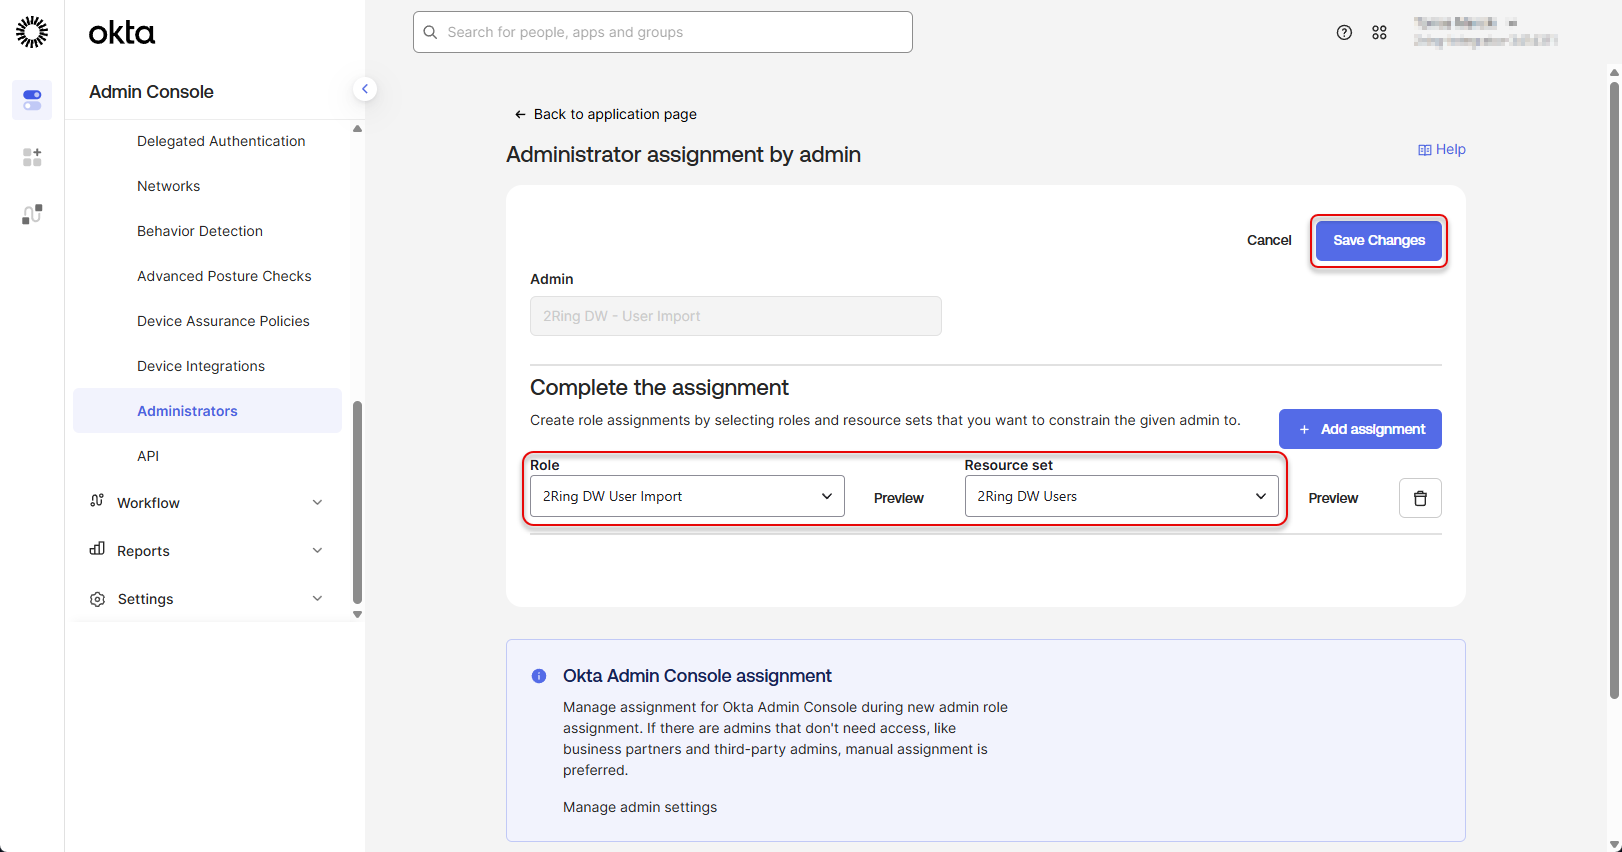
Create new role assignment by selecting the newly created “Role” and “Resource set” and click “Save Changes”.
Figure 39: Configure Okta application 23
Creating groups of users
Groups of users that can be later selected as users able to be imported in the DW application can be configured in the Okta application. To create a group of users, follow these steps:
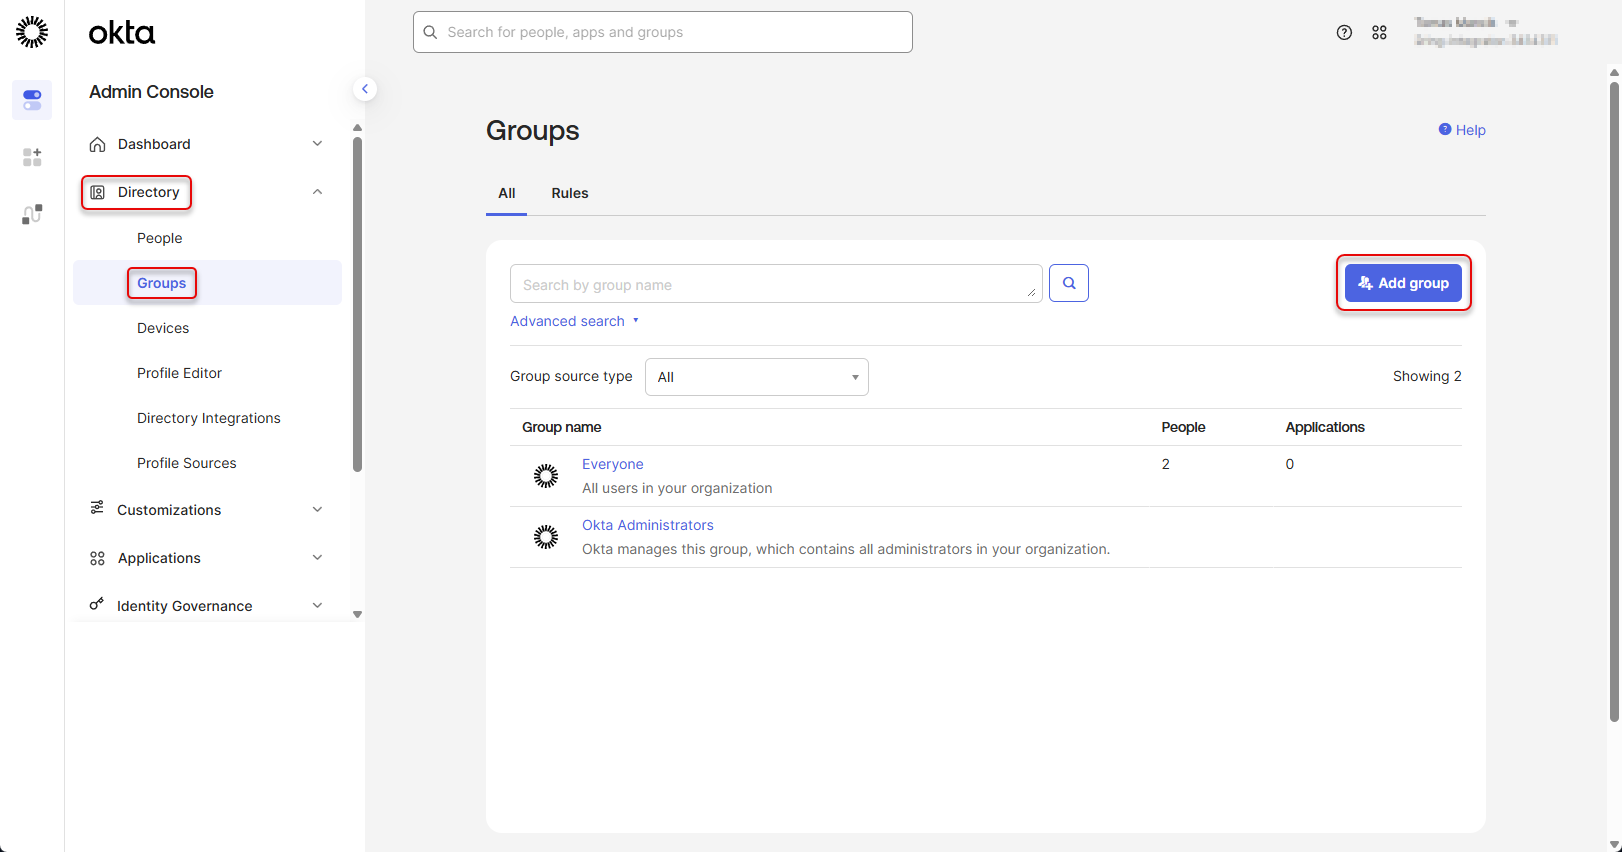
Navigate to “Directory” -> “Groups” and click the “Add Group” button.
Figure 40: Create group of users
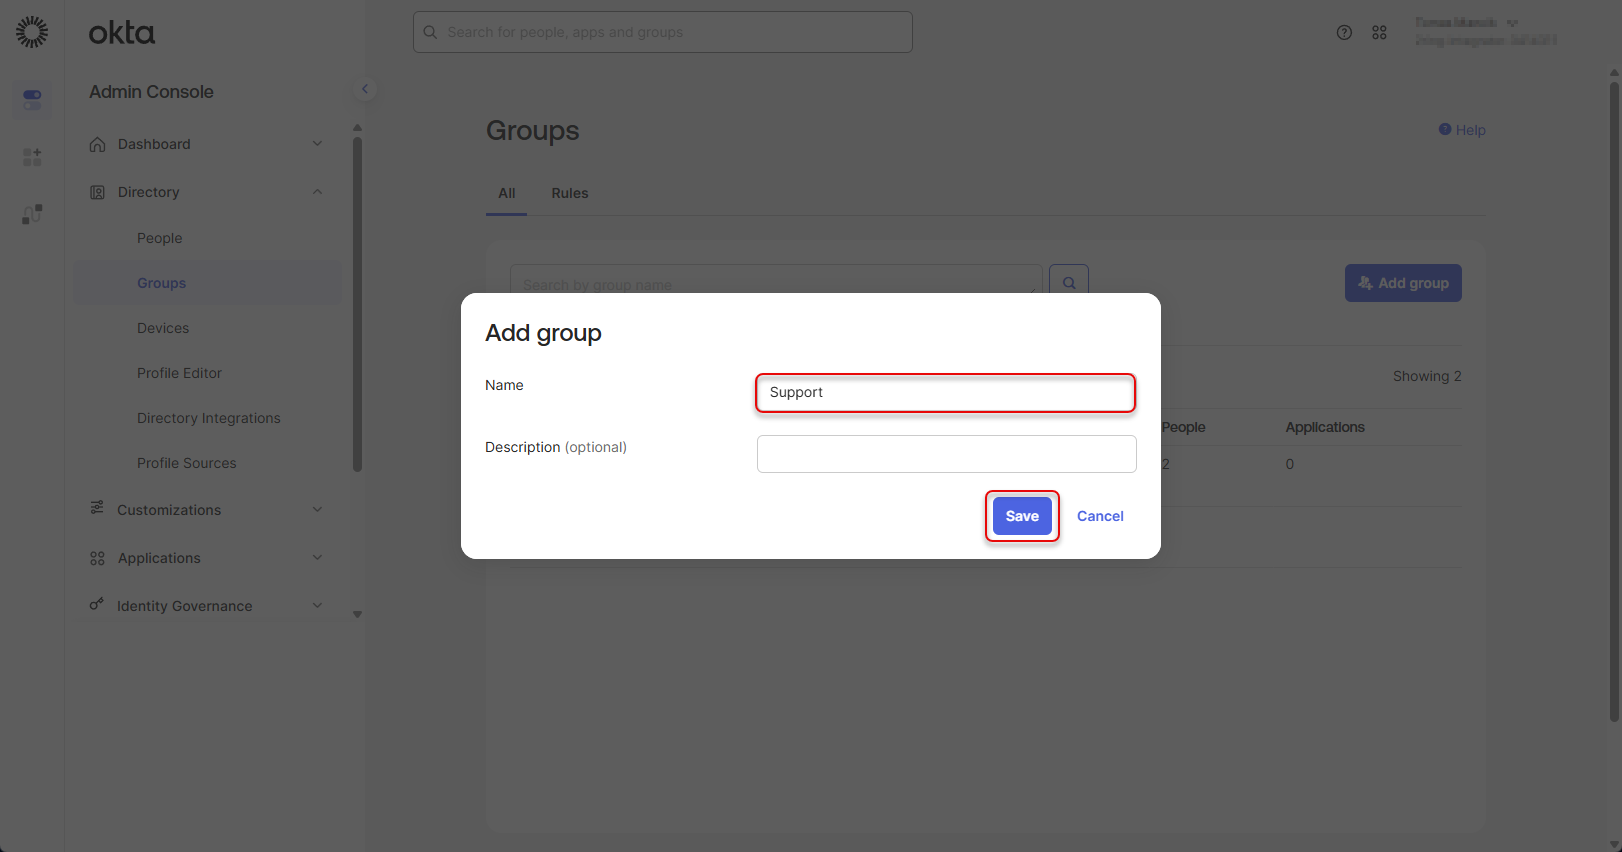
Fill the name of the group and click “Save”.
Figure 41: Create group of users 2
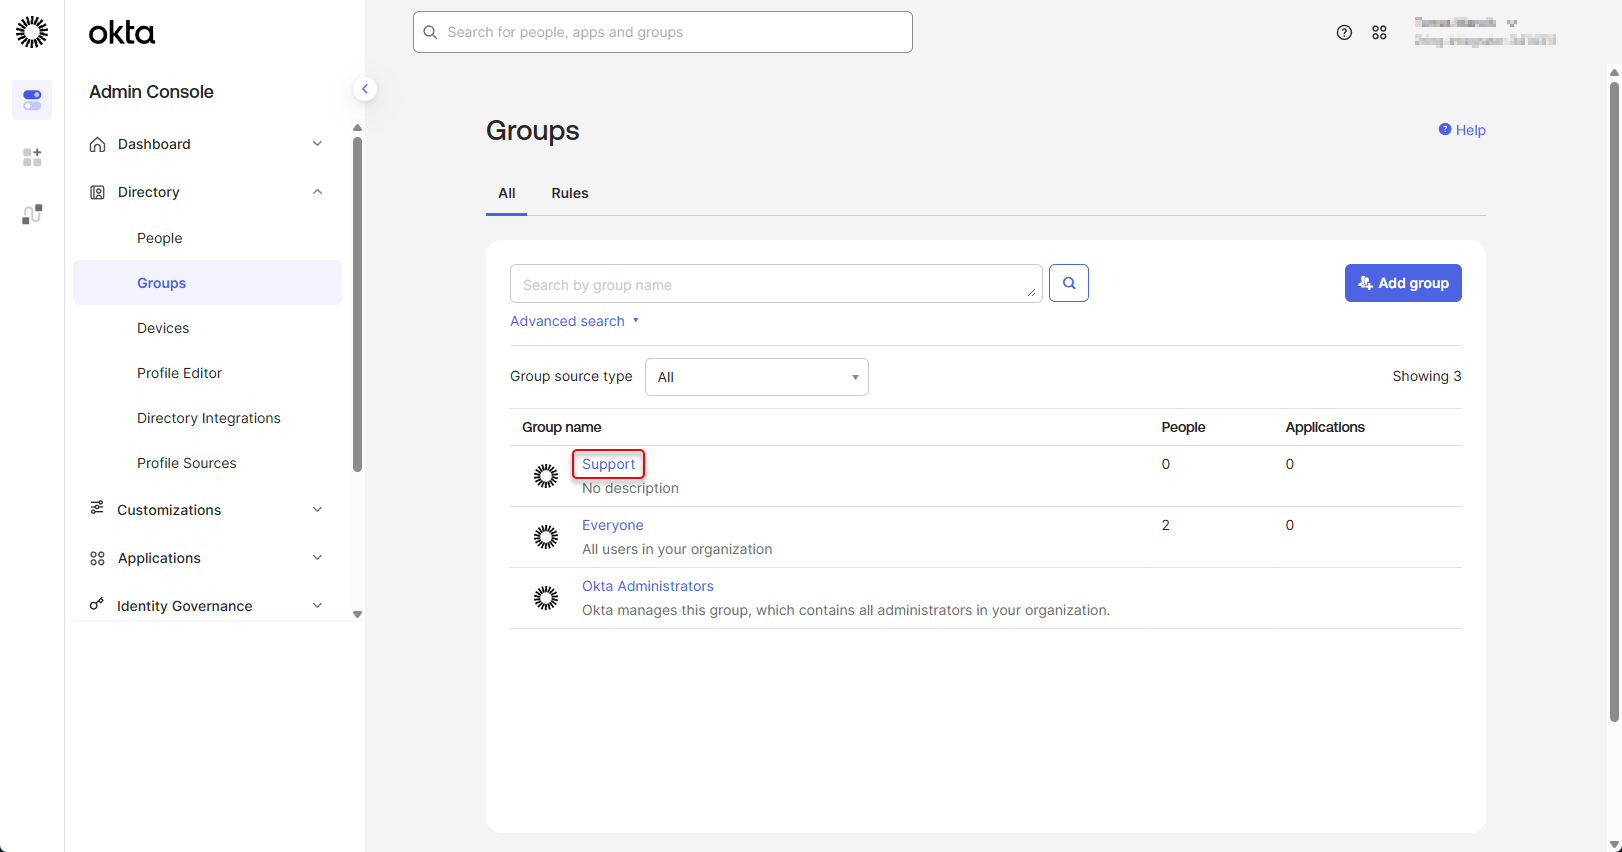
Click on the newly created group of users.
If you don’t see the created group in the list, refresh the page. Figure 42: Create group of users 3
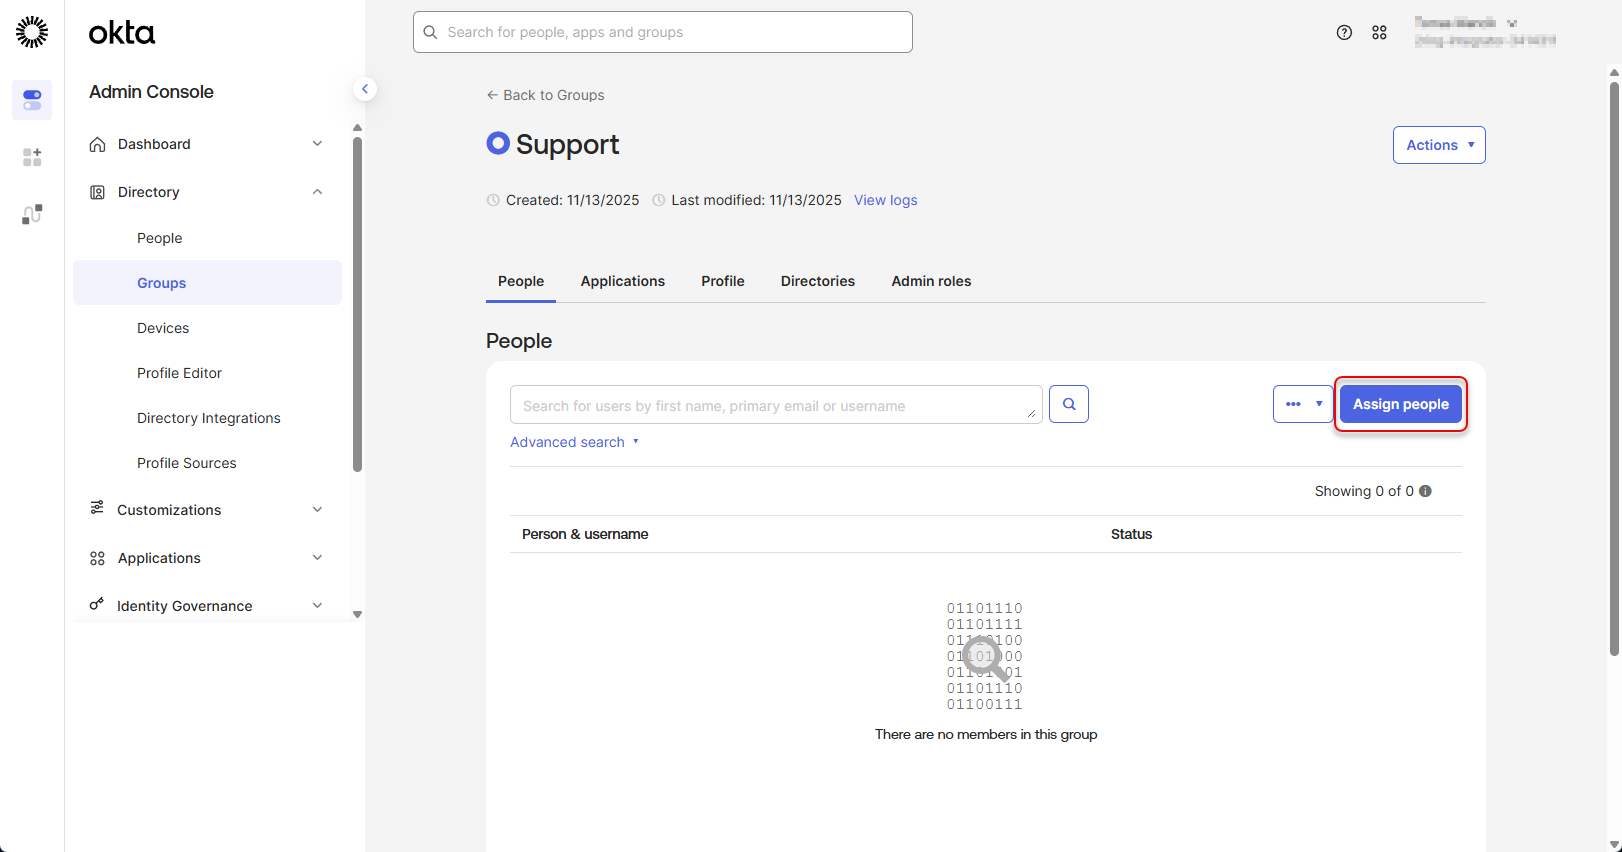
Click on the “Assign people” button.
Figure 43: Create group of users 4
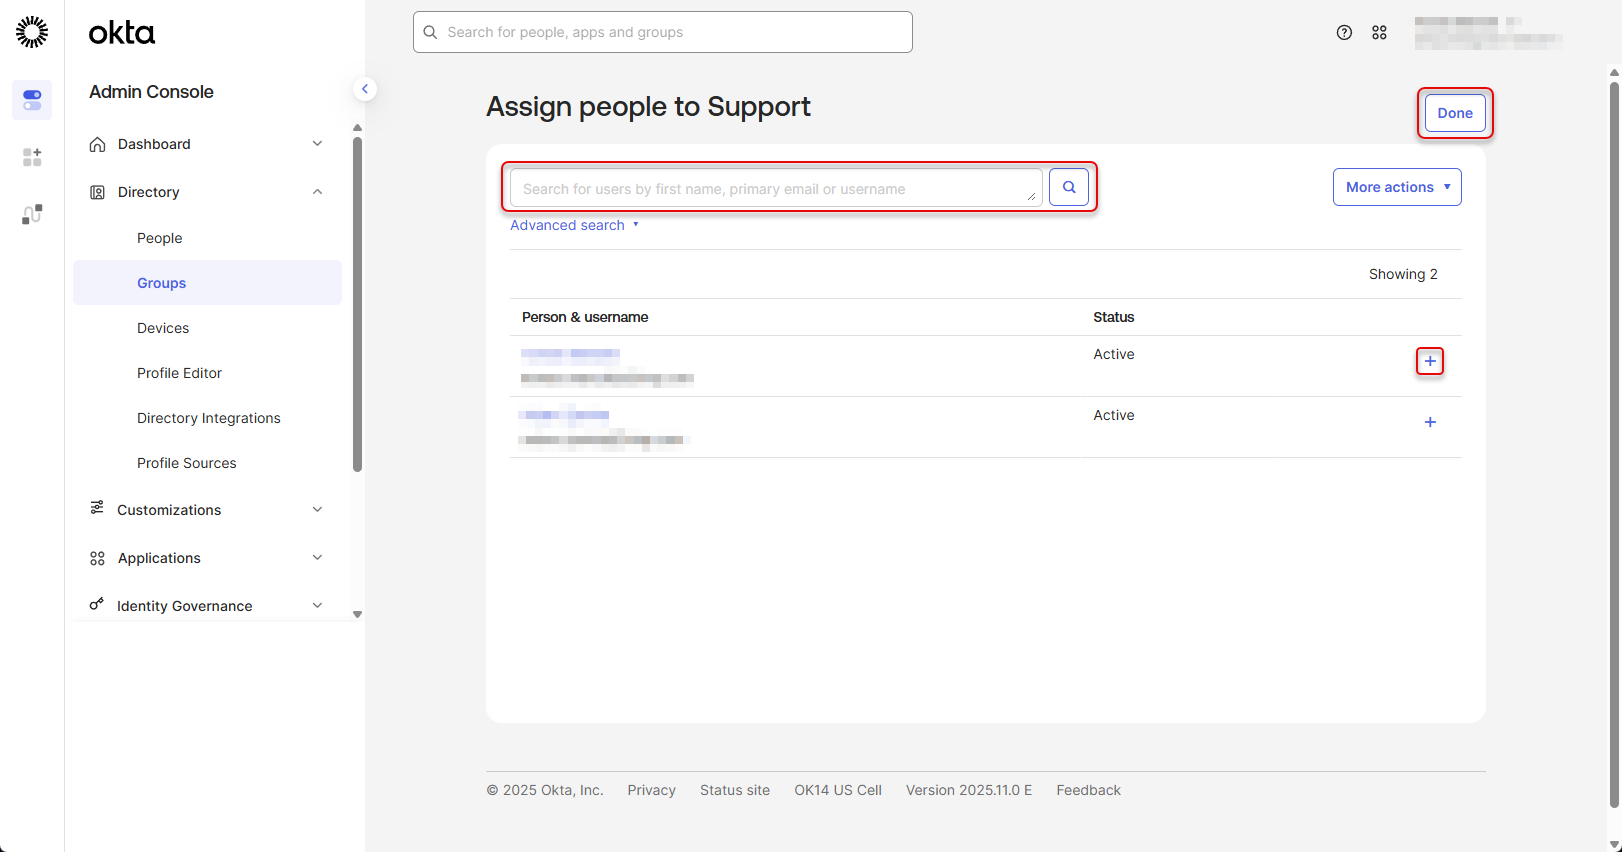
Search for the users that should be assigned to the group and click the button. Once you have all users assigned, click “Done” button. The group of users is created.
Figure 44: Create group of users 5
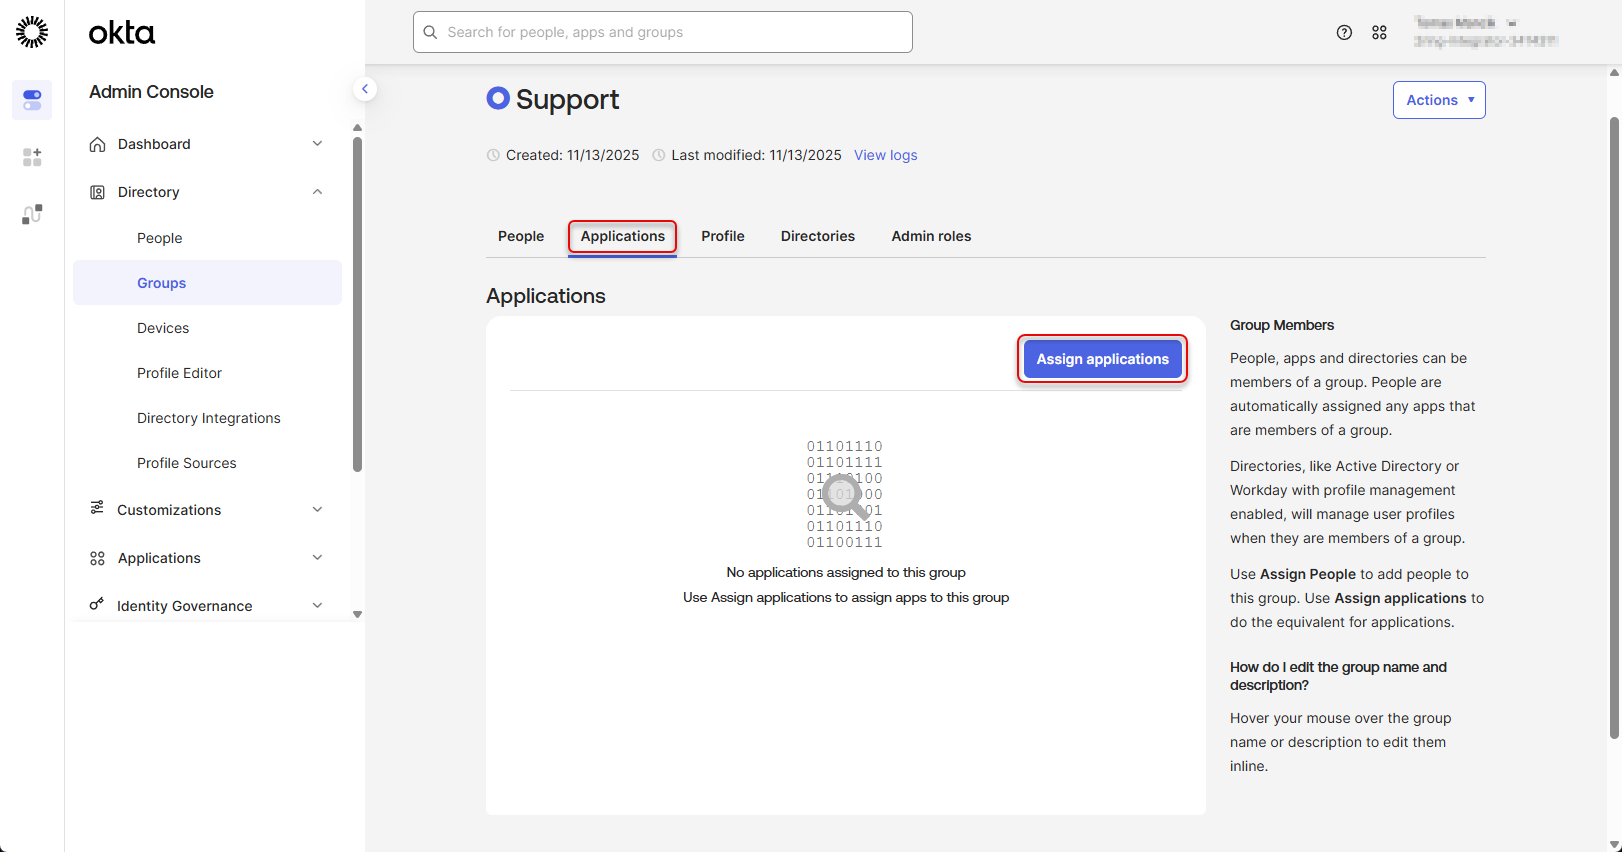
Navigate back to “Directory” -> “Groups” and switch to the “Applications” tab. Click the “Assign applications” button.
Figure 45: Create group of users 6
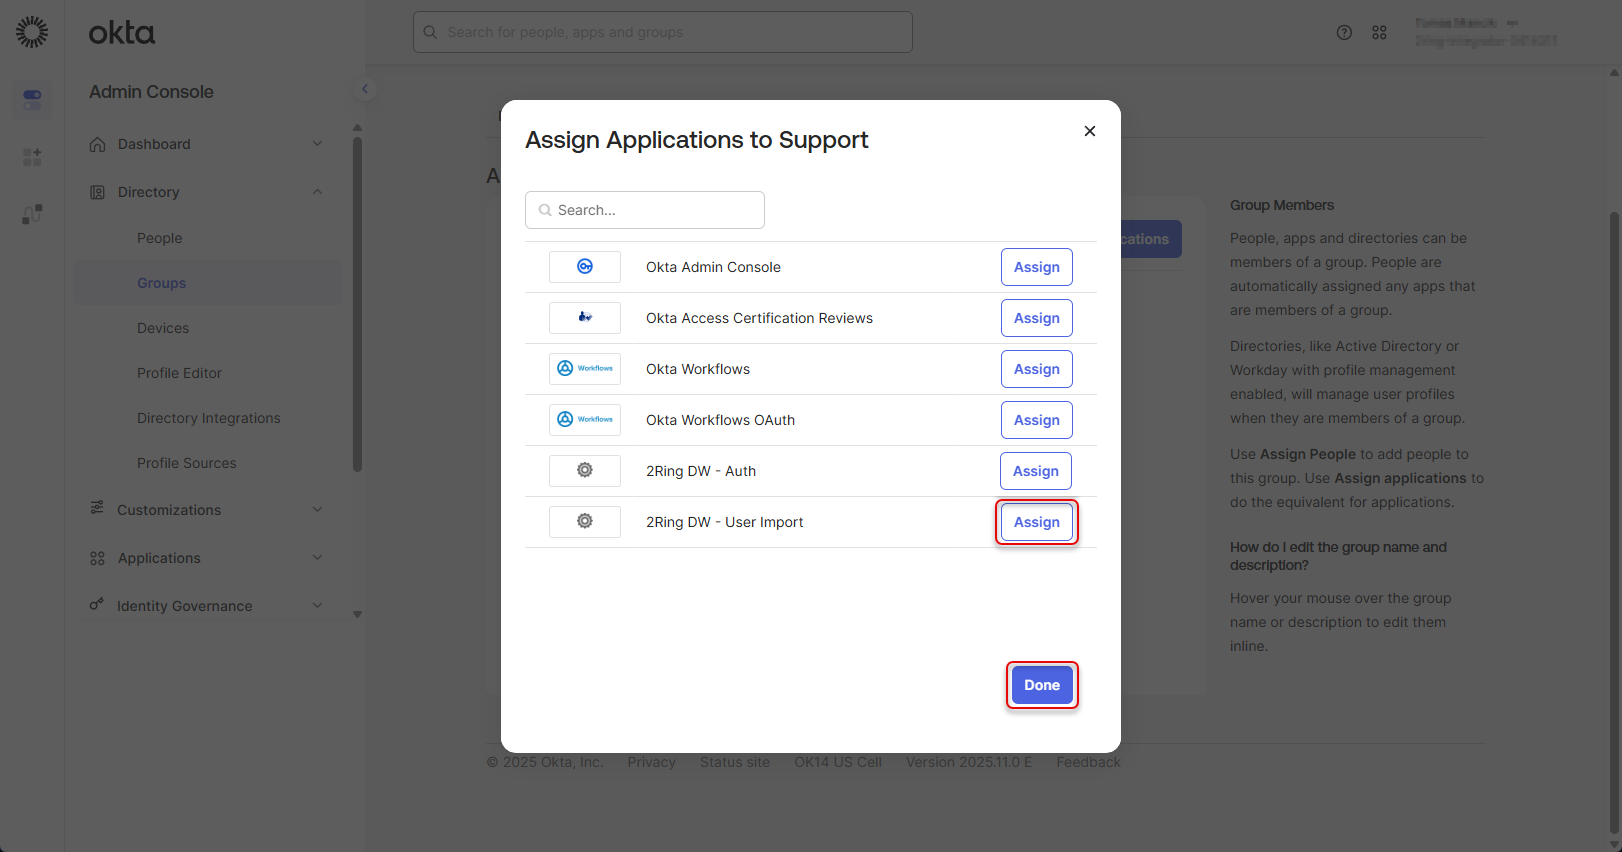
Assign “2Ring DW - User Import” application to the group of users and click “Done”.
Figure 46: Create group of users 7
Afterwards contact 2Ring support and provide the following information:
Domain of your Okta organization
2Ring DW - Auth application: Client ID and Client Secret
2Ring DW - User Import application: Client ID and PEM Private Key